BTP Document Information Extraction
Intro
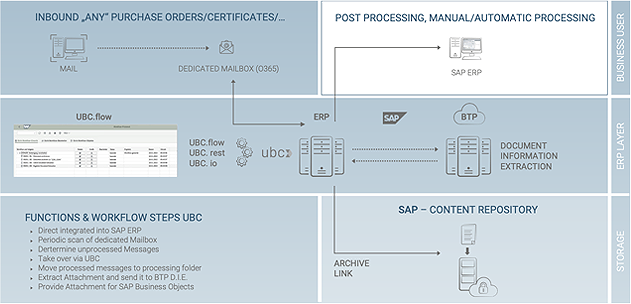
The following documentation describes the implementation of the Document Information Extraction service into the UBC landscape. The Document Information Extraction is an OCR cloud service with machine learning capabilities, running in SAPs BTP (Business Technology Platform) enviroment, that can extract text data from an unstructured document. This data can be queried in a machine-readable format to be used for further processing. The service supports multiple file formats, however we recommend using ".pdf" format. The service comes by default equipped with the ability to process a few standard document types, these are: invoices, purchase orders, payment advice and business cards. In case we choose to process custom document types, a few initial customizing steps are neccesary. The objects to be customized and created will be described in the sections below.
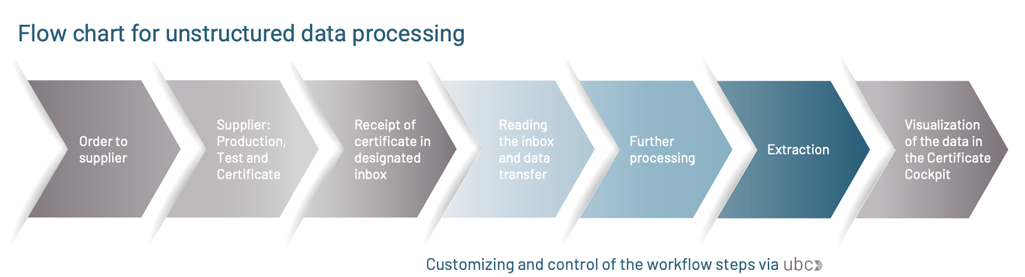
UBC now provides all the functionalities neccesary from processing incoming E-Mails, over sending to Document Information Extraction, checking and enriching the results, to start the post processing for the Extraction Results. All covered by a smooth cross system Workflow in SAP, without any middleware needed, controlled by UBC.
Document Information Extraction
Document Types
Document Information Extraction comes with a few pre-delivered standard document types:
invoicepaymentAdvicepurchaseOrder- ... (growing, see SAP Help)
It is also possible to choose the document type custom if your document is not matching to this list. An example for a custom document type would be certificate.
Choosing custom means:
- you are forced to use schema and template configurations
- no pre trained models available, you are responsible for training the recognition. Please see SAP Help
Schema
This is mandatory for custom document types. For standard document types, you can use the SAP_* schemas. Nevertheless, you are free to also create schemas for standard document types, if you want to reduce or extend the available fields for extraction.
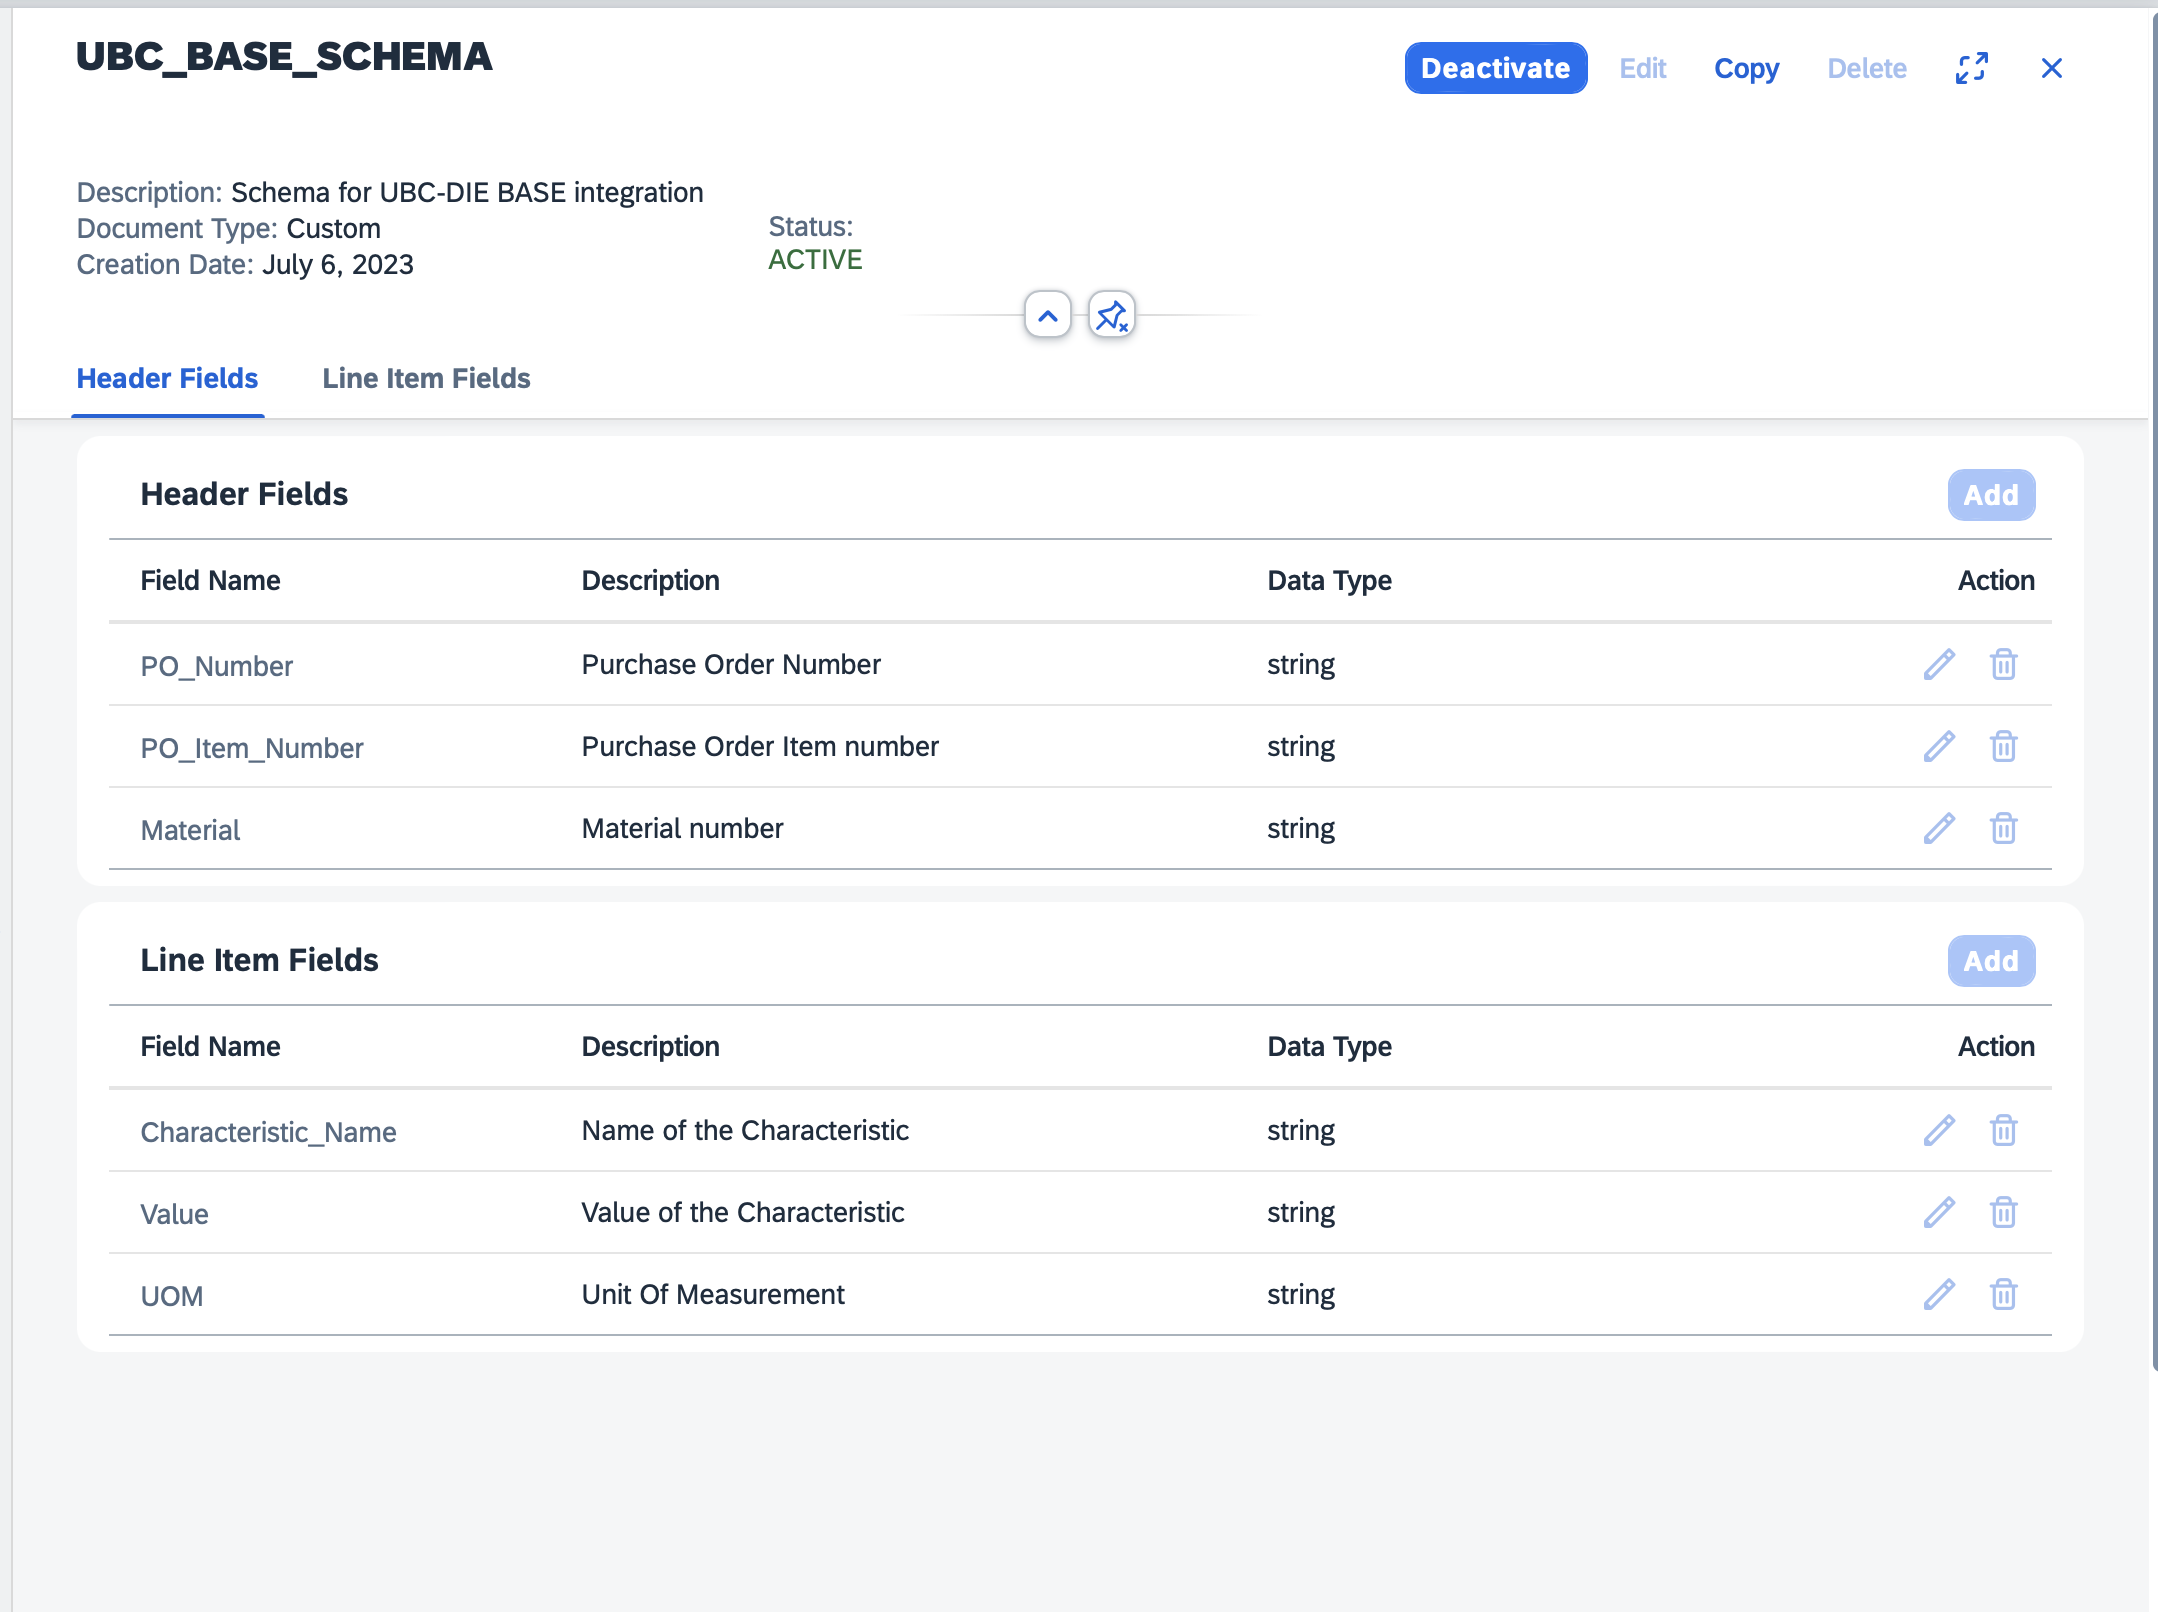
A schema is a collection of potential extraction fields. This can be understood simply as empty variables that are to be filled by the extraction service. We need to define a name and type of the variables. There are only a few possible variable types, number, string, date currency and discount. More important however are the names of these variables, these are used when quering the extracted data as a key-value pair. For this we would recommend using the same name as the target fields in postprocessing, however custom mappings can also be implemented. As standard, header fields are used for data that appears only once per document, line items are to be used for tables.
To create a schema, go to the home page of your Document Information Extraction instance, click the settings icon on the lower left side of the screen and click on the "Schema Configuration" option. Here you will have the opportunity to create and maintain schemas.
As for the naming convention of the schemas we would recommend to use the classic conventions of the customer. The naming convention of the schema fields should be clear and understandable. The best way is to use SAP standard descriptions or some meaningful substitute (for example purchase order number could be "ebeln" , "po_num" ).
Template
This is mandatory for custom schemas. For standard schemas, the models are already pre-trained with a large set of data by SAP.
A template can be understood as a map for the extraction service to be able to find the data and fill our extraction fields (based on the assigned schema) for our specific document layout. First, an already active schema needs to be assigned to a template, so make sure there is already one created and activated.
For custom document types, we would suggest defining one schema per process. The reason for this proposal is the automatic template detection functionality of the service, which can automatically assign the correct template to the document based on its layout and schema. So, if we have five different pdf document layouts from which we always extract the same information just from different positions, we only supply the schema, and the service assigns the correct template automatically.
A template needs an example document to be uploaded with the same layout as the future documents to be processed.
On this uploaded example we can then annotate the positions of data to be extracted, each header field and line items of a table. We have to try to be as precise with the annotations as possible. Also keep in mind to choose the best sample document/documents for a template, in some cases we experienced issues if the annotated text was significantly shorter than the later in the processed documents. The results will be affected by the quality of the document layout, for example if the lines of the table are close to each other, not separated by lines can result in worse extraction results. Similarly, the image quality of the document is a factor affecting the extraction results quality if we are to use picture formats.
To create a template, go to the home screen of your instance of the extraction service and click the second button on the left pane called "Template". Here you will have the opportunity to create maintain templates. After the uploaded example document gets processed, you can annotate the data into the schema fields. To annotate press the "Annotate" button and then press "Edit" on the upper right pane. Use your mouse to select the text data.
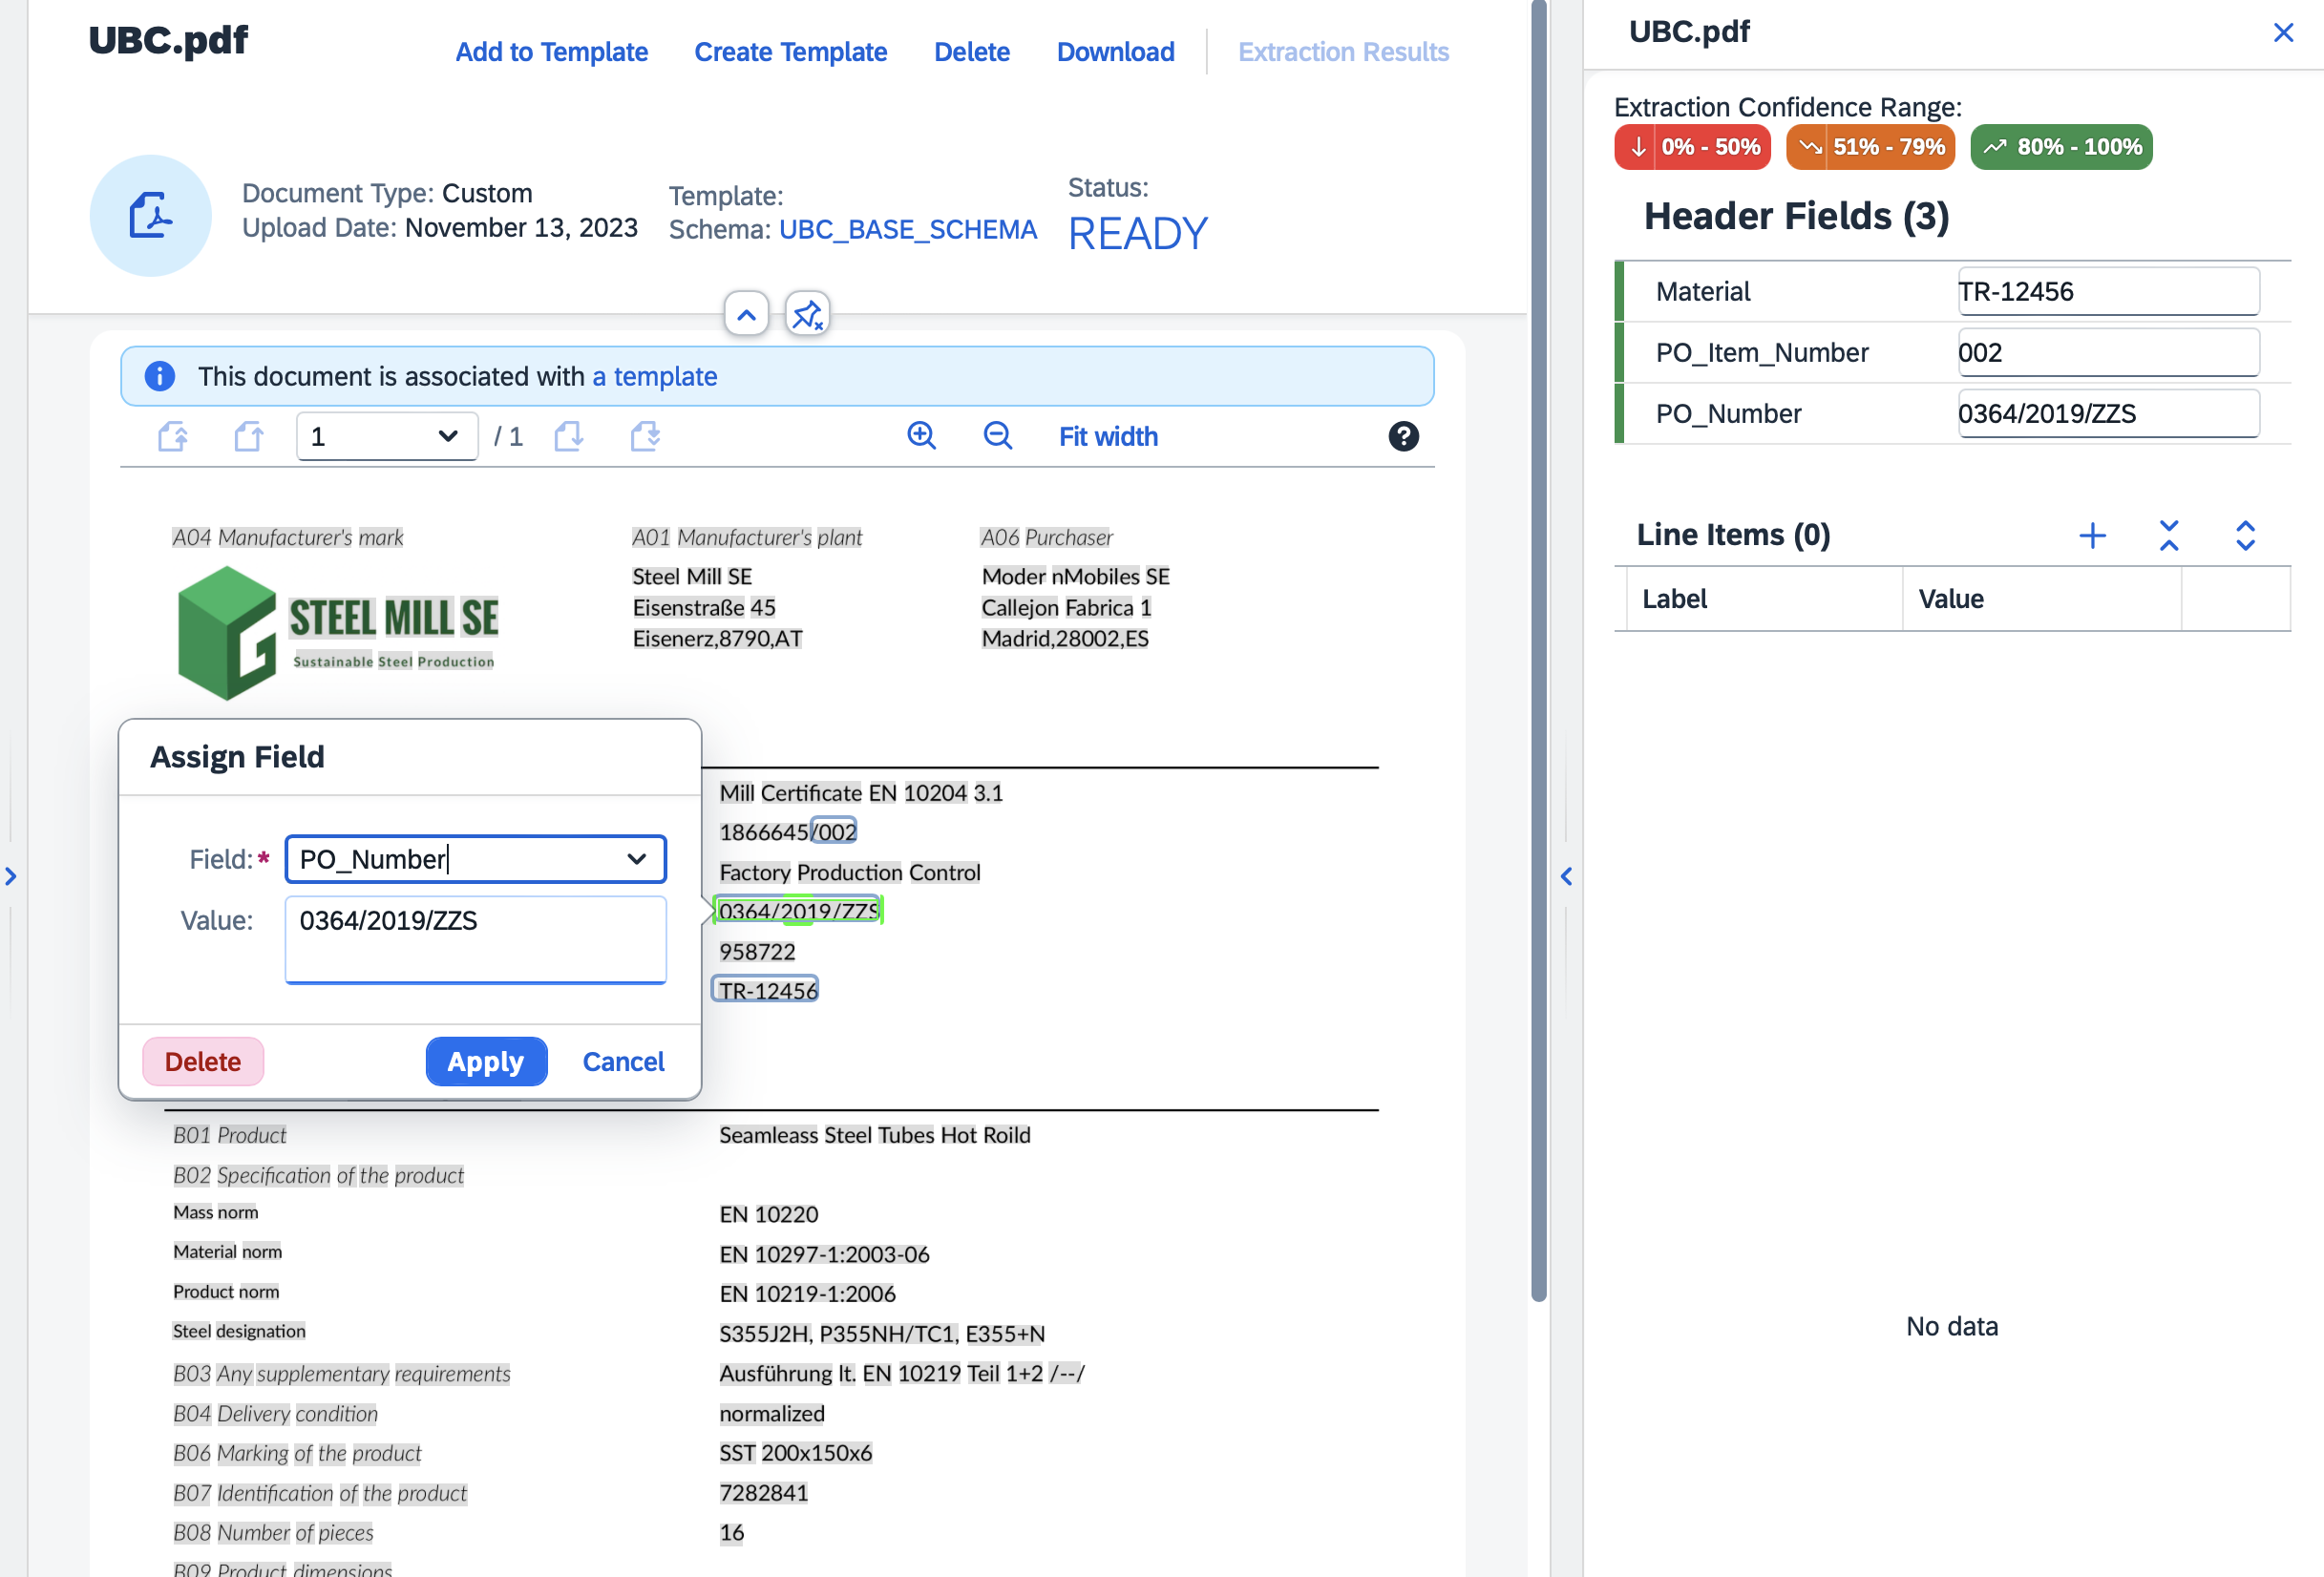
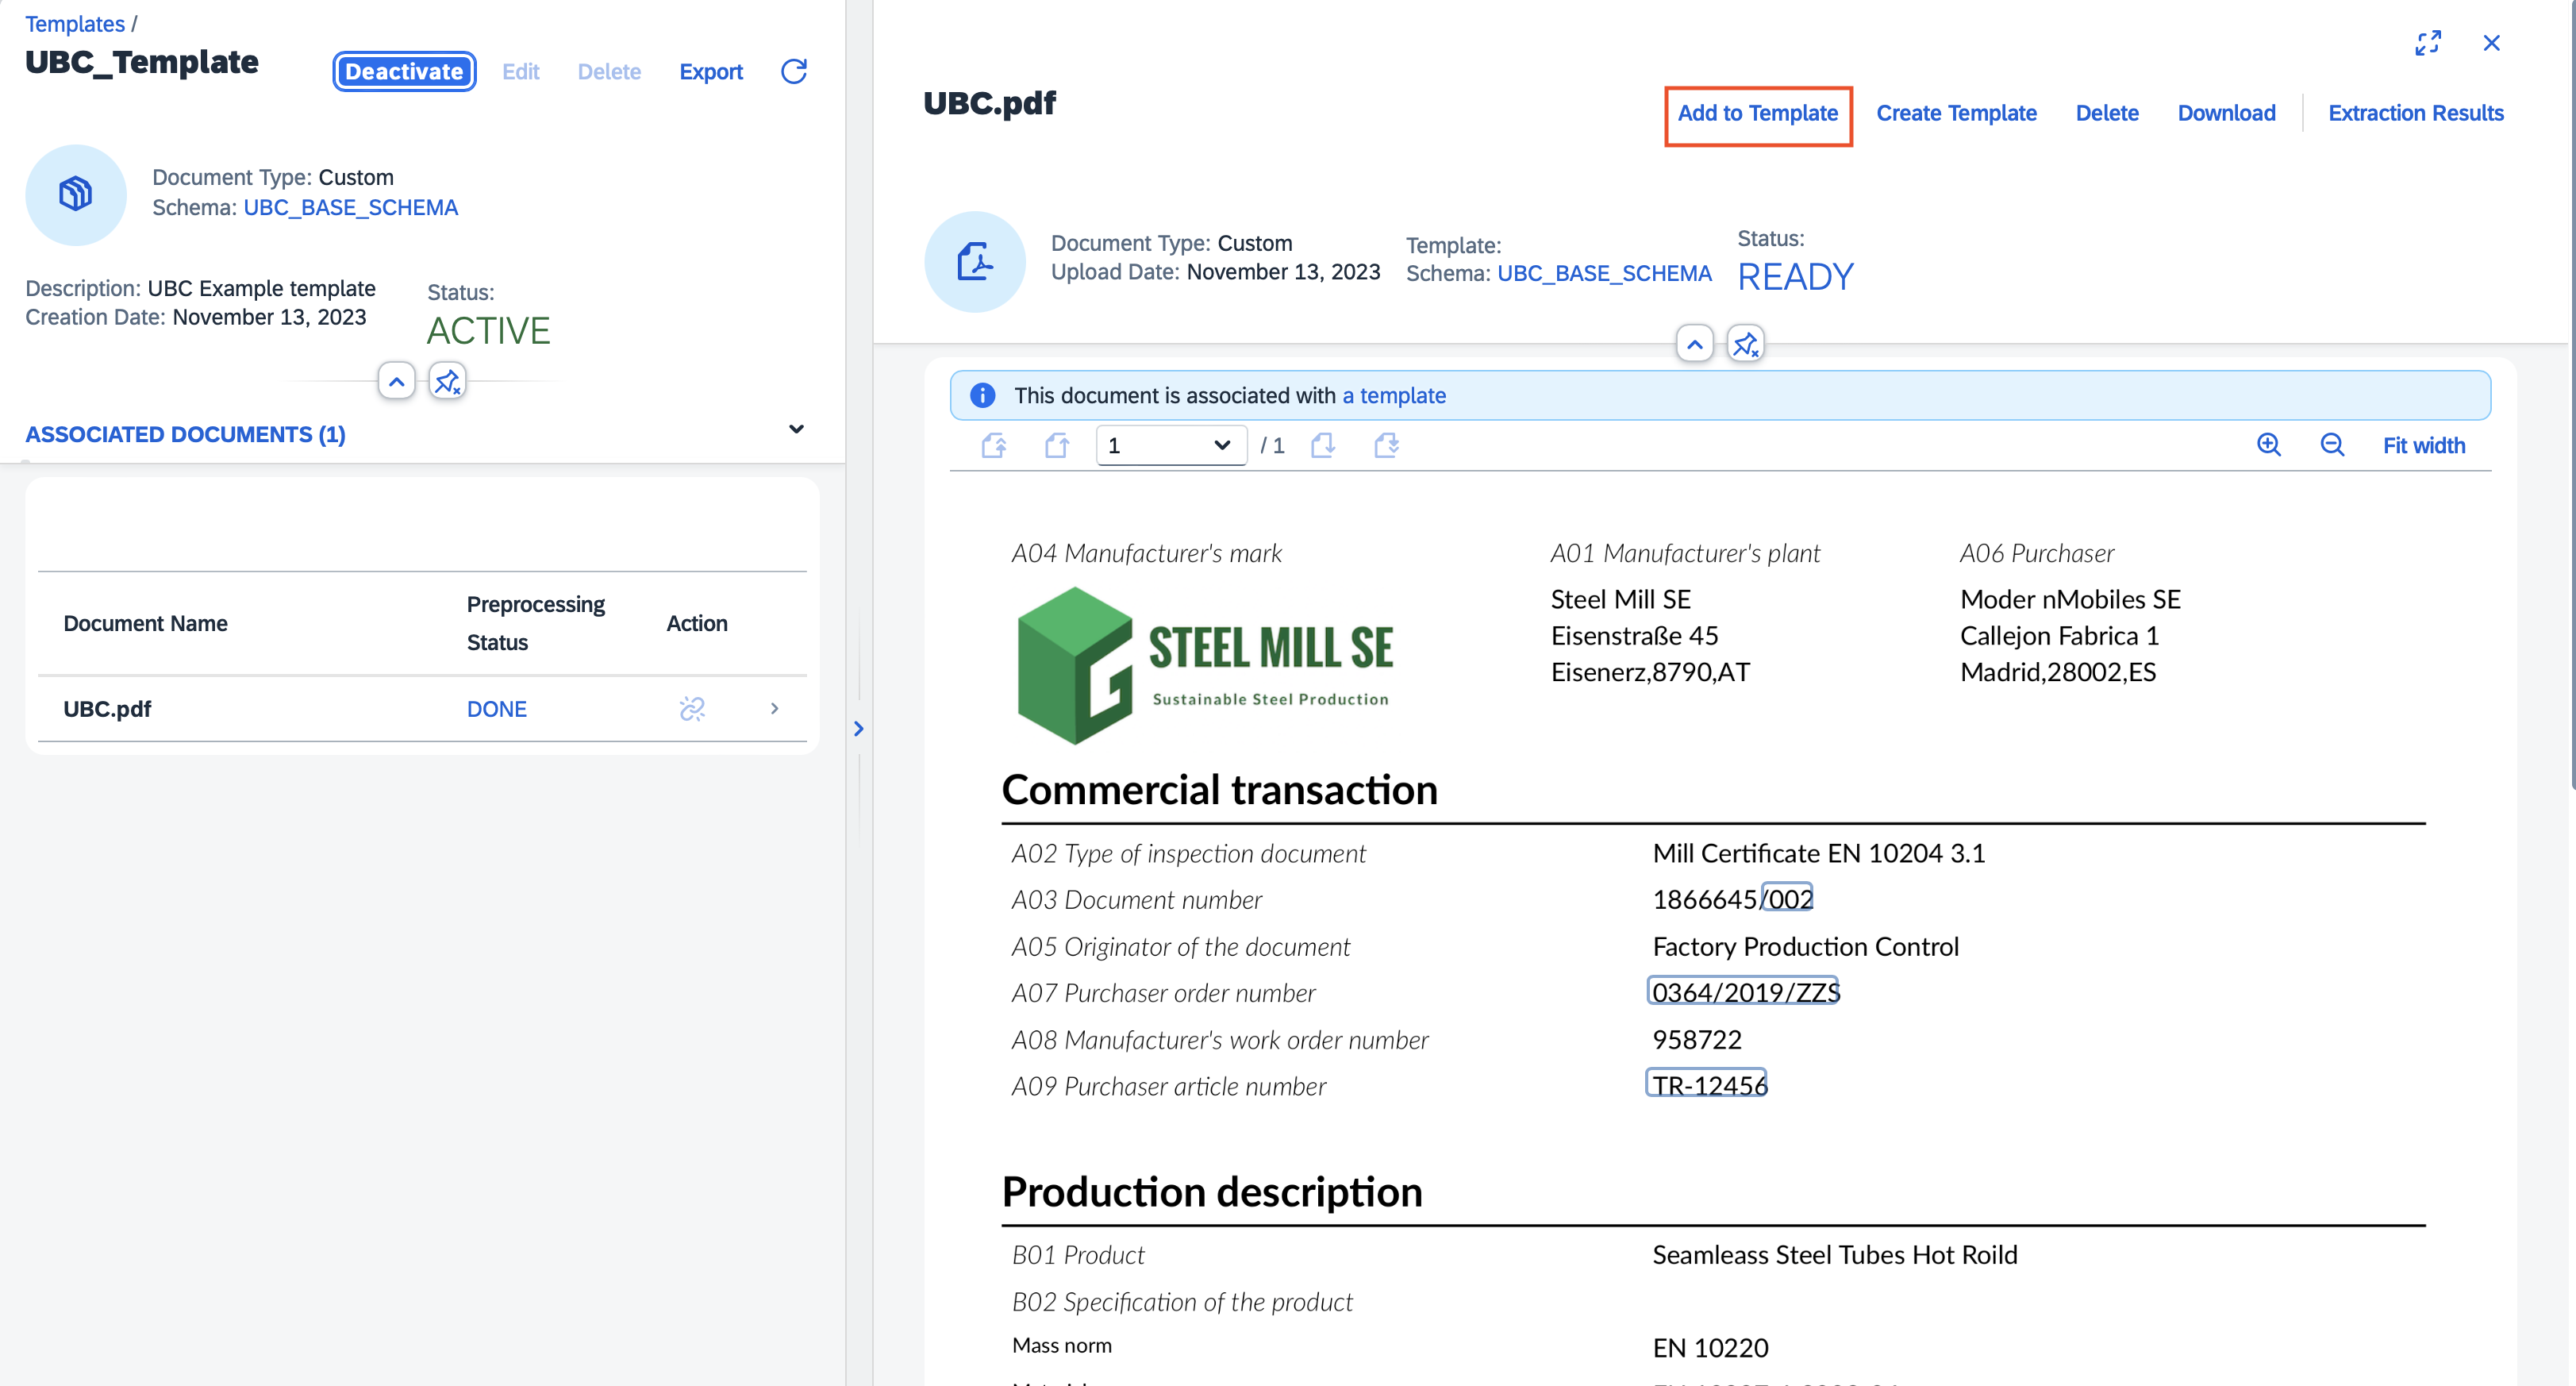
In the current version of DIE the template creation process was changed. To assign a document to the template we need to first post the document for extraction manually, assign the schema to it and process it with an empty template. After the processing is done, we need to annotate the data like before and then click on the 'Add to Template' button to add it. The document will be linked to the selected template that we can activate and use.
Extraction in DIE UI - for testing purposes
After we are finished with the (optional) customizing of our schemas and templates, we are ready to process documents. Each document uploaded will be processed using a schema and a template which are chosen during the upload of the document for extraction.
For the Document Information Extraction UI, you have to assign Role Collections to the End Users in order to be able to access and navigate the UI. See SAP Help for details.
To upload a document manually for testing purposes:
- go to the home screen of the extraction service and click the "+" button on the upper right pane
- fill out the required data, document type and schema. You can also assign a template, but it can also be detected automatically with the "detect automatically" option
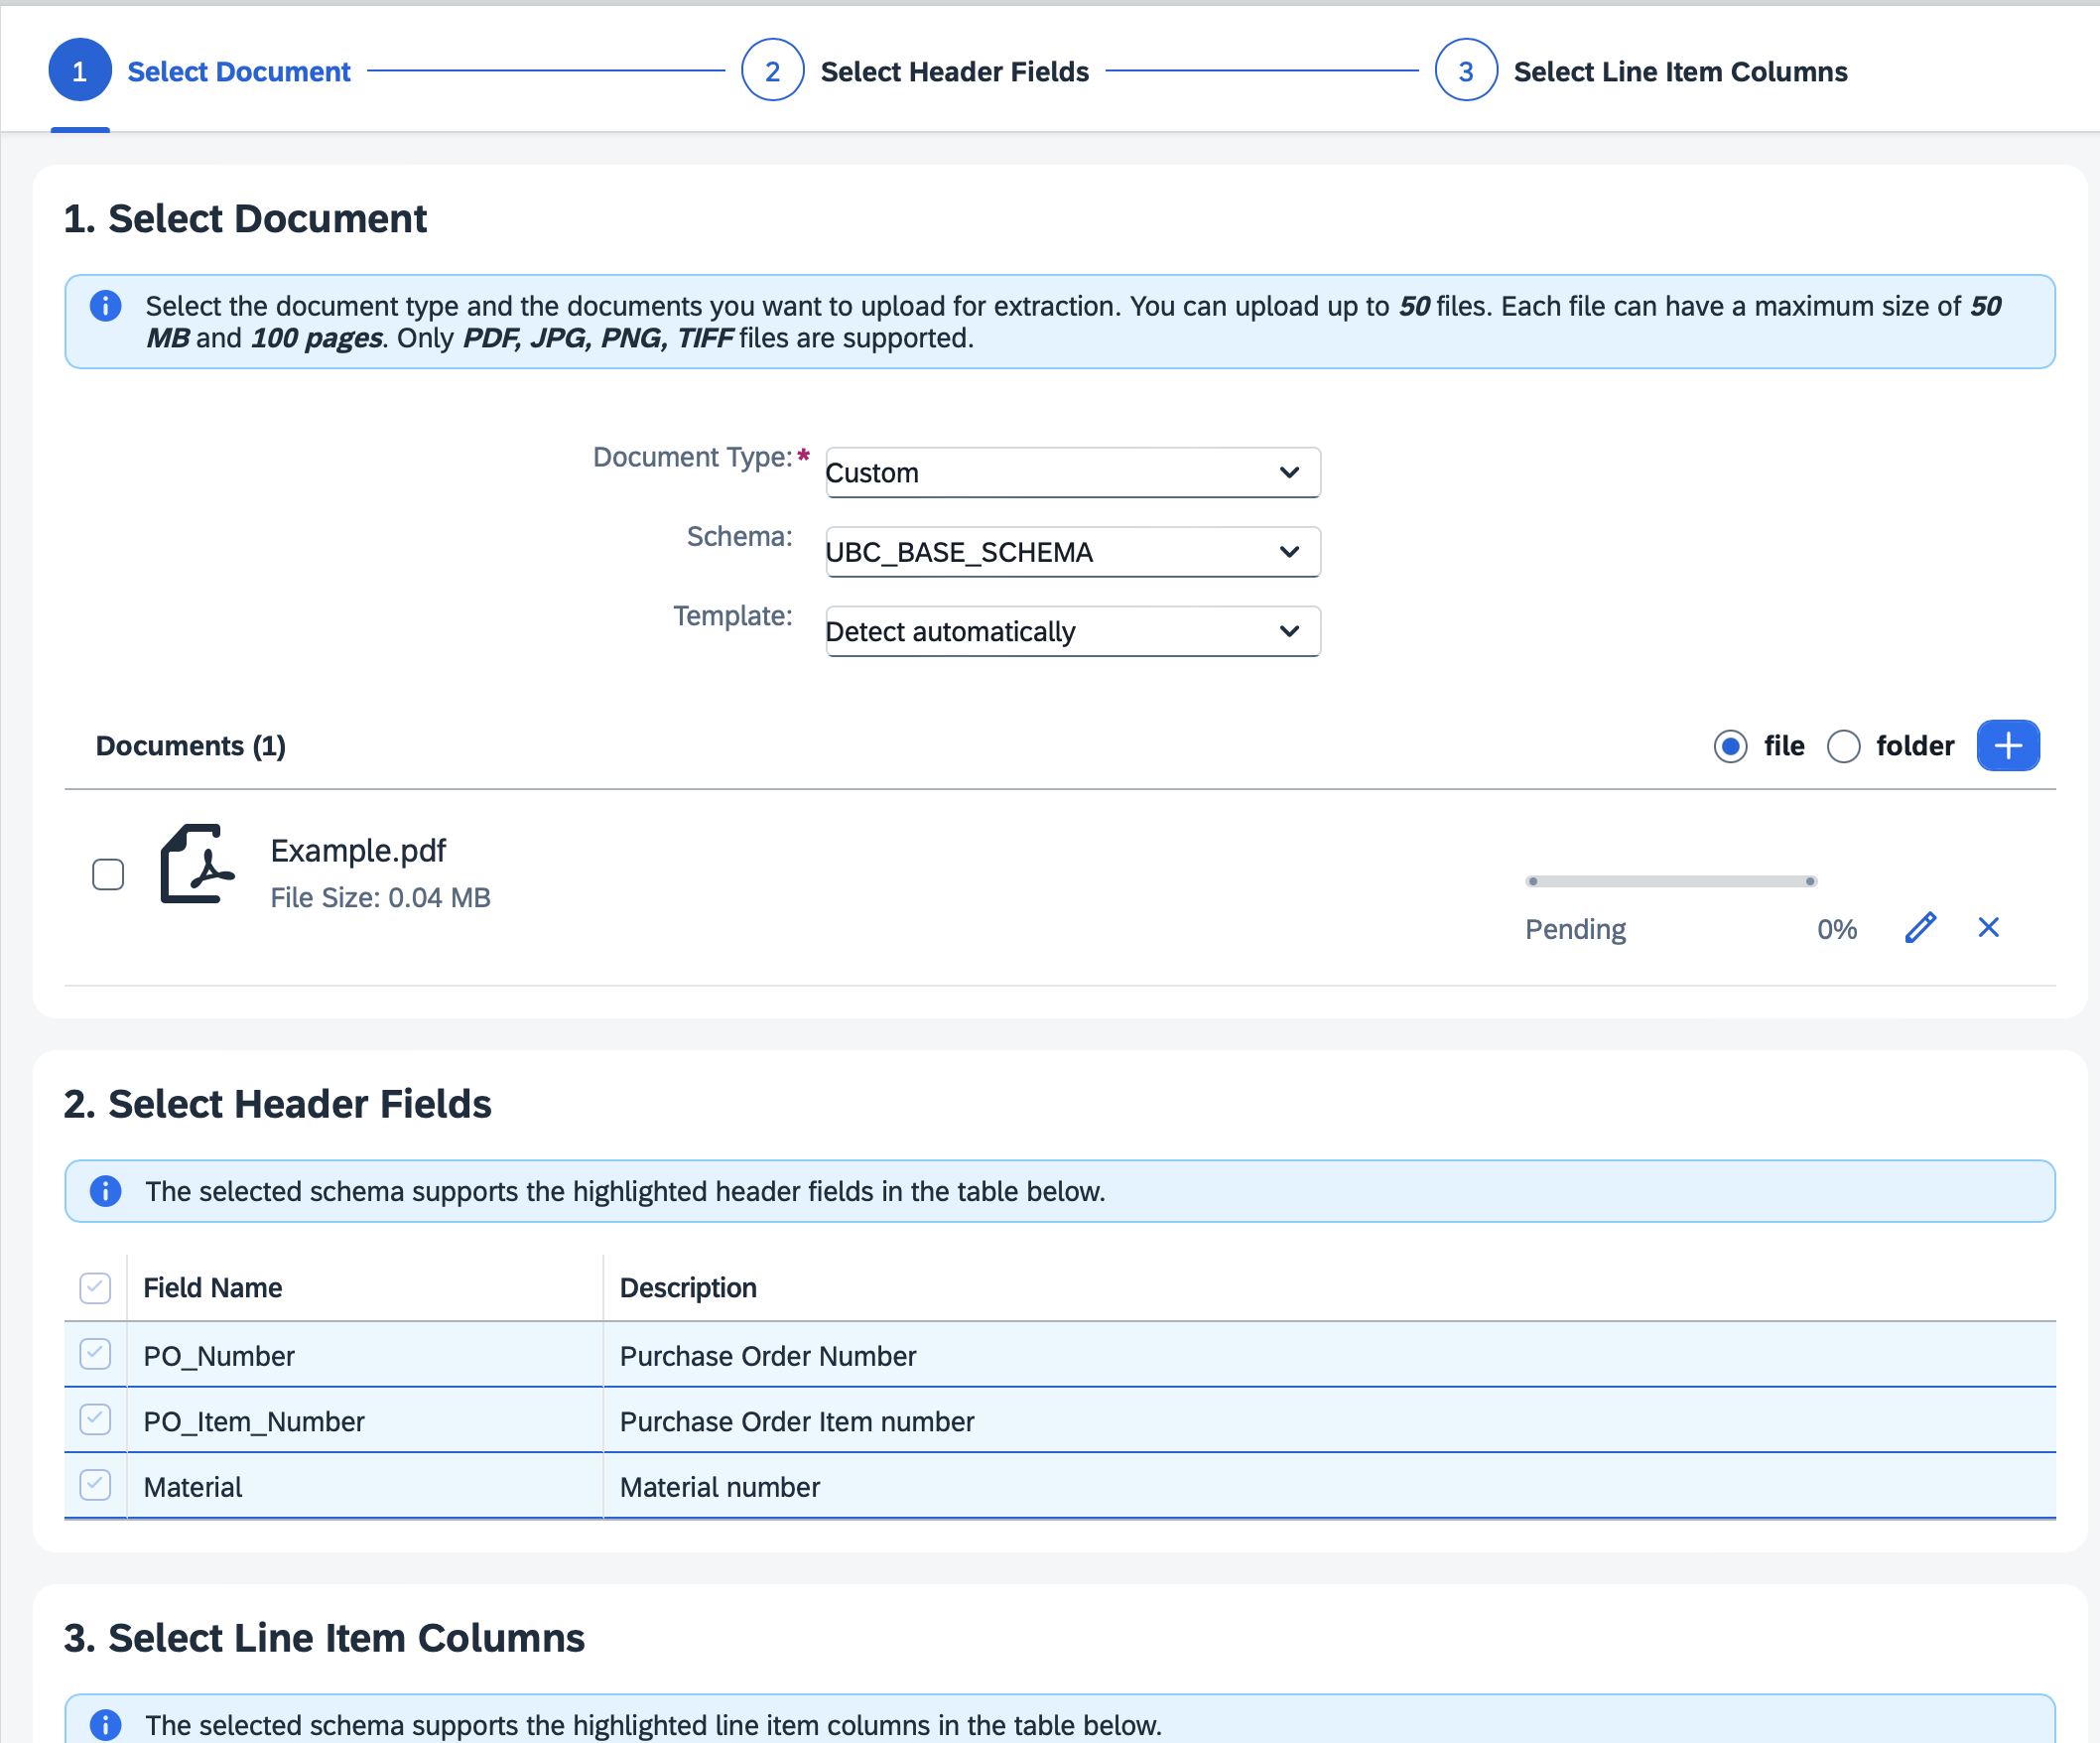
- Choose a file and press the "Step2" button that will show you the extraction header fields from the schema
- Continue by pressing "Step3" that will show you the extraction line item fields from the schema.
- Press "Review" and "Confirm" to finish the process.
- The document will show up on the home screen and will have the status "Pending"
- After the status changes to "Ready" you can examine the results
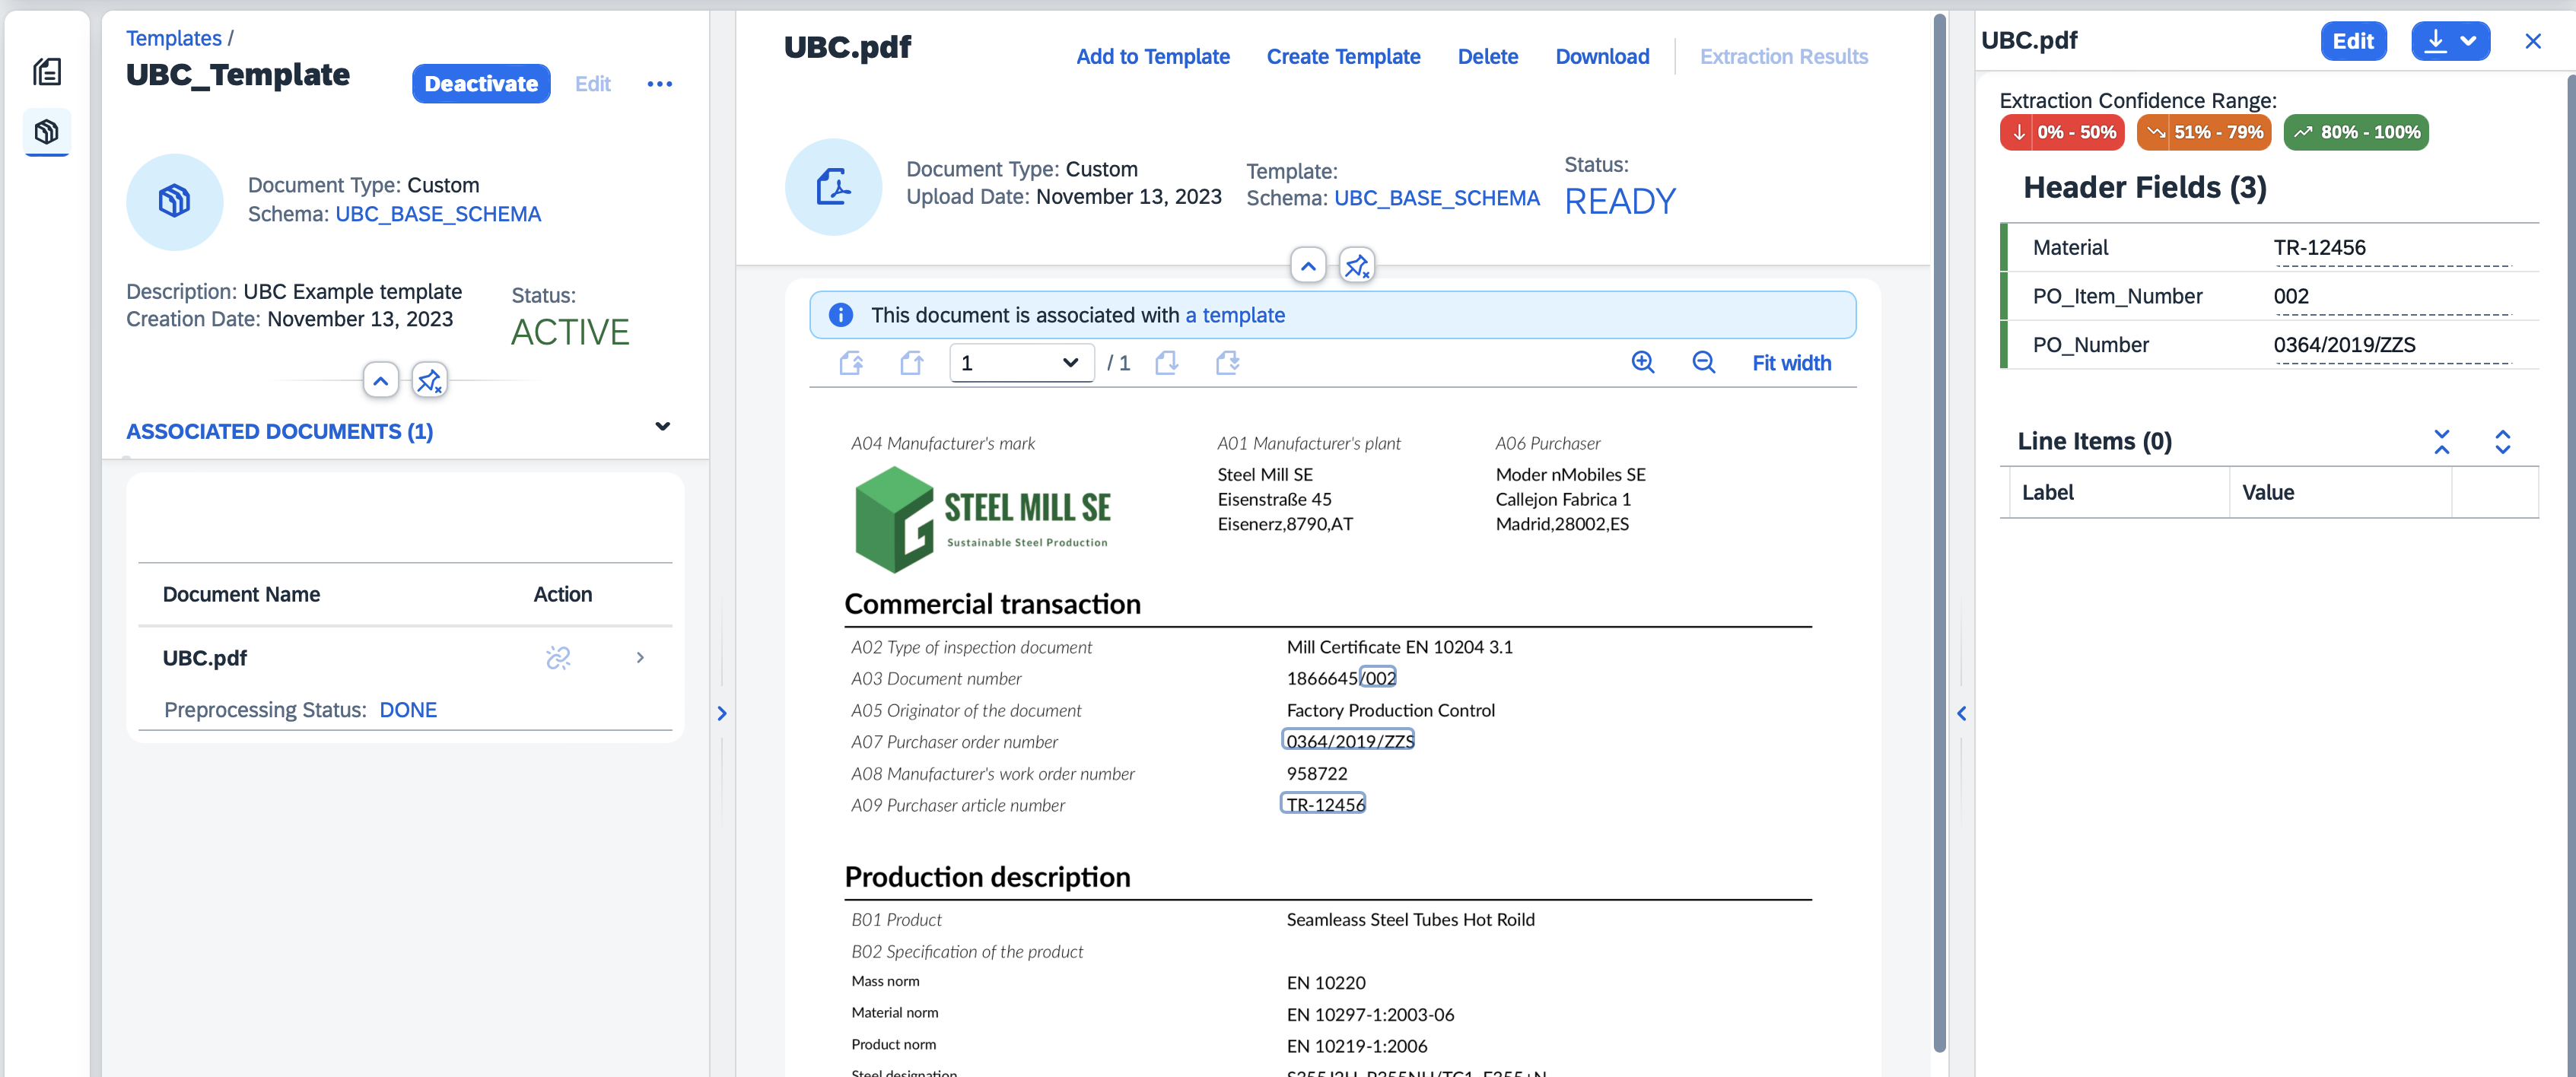
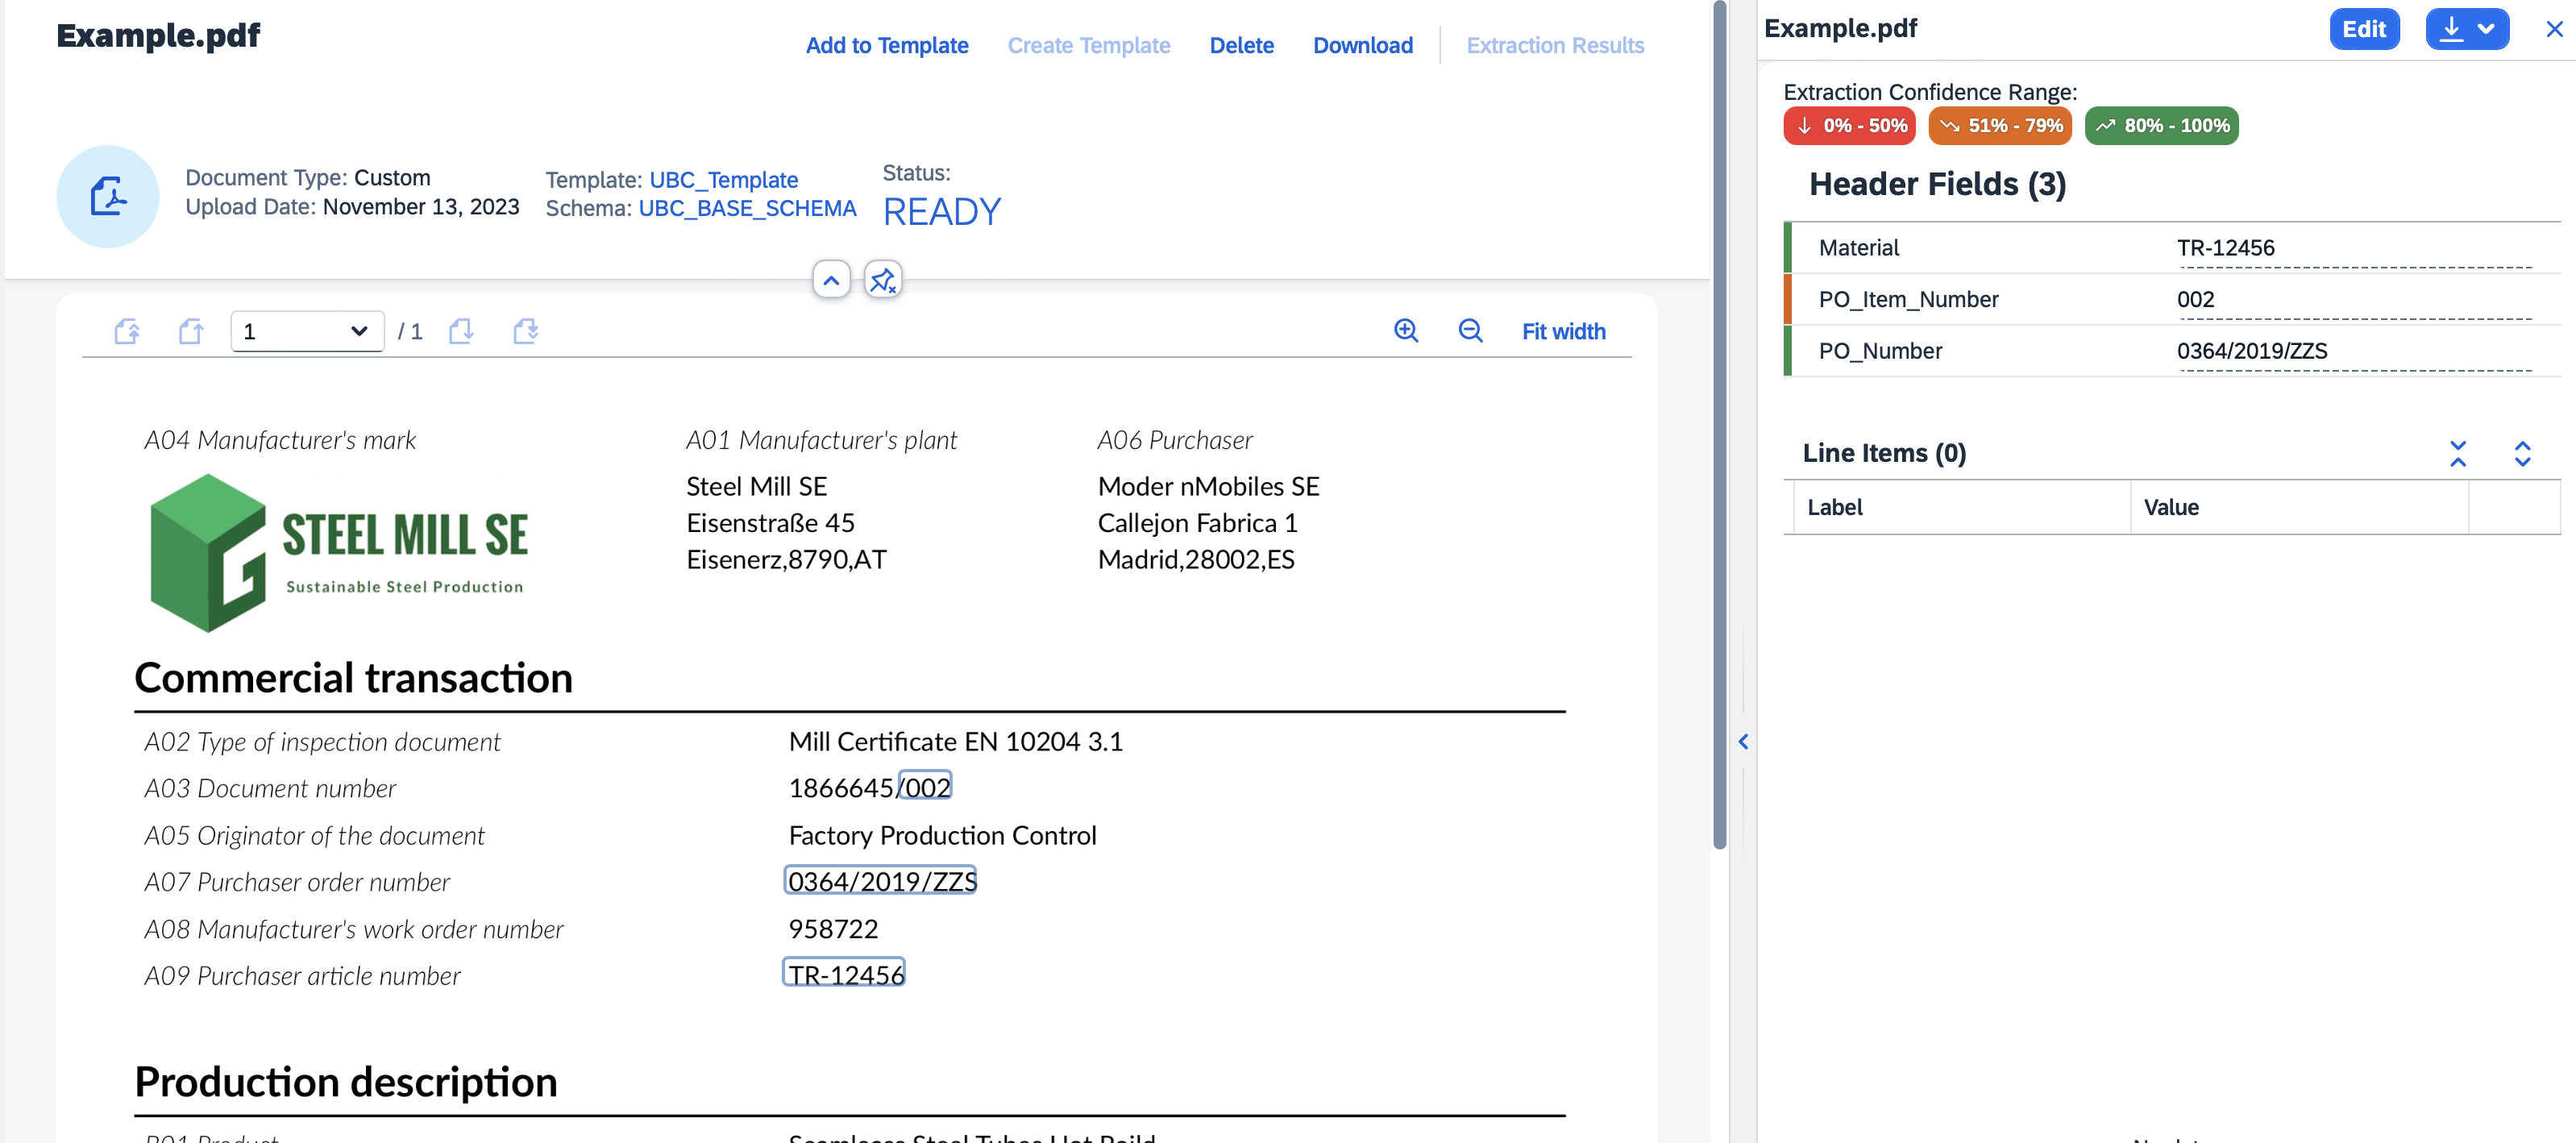
- Click on the table entry to open the document and press "Extraction Results" button on the upper right pane.
- Here you can inspect the result and correct them by pressing the "Edit" button.
- After editing you will have the opportunity to confirm your changes, that also means the document will be locked and it is expected that all the extracted data is 100% correct. You will also have the option to provide your file to SAP for the chance to be included in the training of the extraction AI (this does not mean it will be included in the training data).
info
Each extraction result field displayed also shows the "Confidence" of the result, which means "how good" the extraction is from the AI point of view. Naturally results with low confidence can have correct values and vice versa, however this is not the rule.
UBC
Trigger
We offer standard integration for E-Mail by scanning an O365 Mailbox. Basically the Document Information Extraction process/workflow starts by receiving a "file". As we offer standardized APIs, any custom process can trigger the Document Information Extraction and evaluate the results:
- trigger by incoming E-Mail
- trigger by file on a share
- ...any other custom process...
For not using the standard E-Mail integration, just skip the Mail specific steps during setup. You are free to trigger Document Information Extraction by any custom process (e.g. after reading file share) with a few lines of ABAP code.
try.
    cast /ubc/if_die_bo_mail( /ubc/cl_bo_factory=>get_instance( )->create_by_key( value #( object_type = 'YOUR_UBC_OBJECT_TYPE' ) ) )->trigger_standalone(
      exporting
        is_input       = value #( attachments = value #( ( content_bytes = value xstring( )
                                                           content_type = 'application/pdf'
                                                           name = 'test.pdf'
                                                           size = xstrlen( value xstring( ) ) ) )  )
        is_proxy_die   = value #( organization_id = 'DIE_PROXY' )
      importing
        et_message     = data(lt_success_message) ).
  catch /ubc/cx_core into data(lx_core).
    message lx_core. "technical error occured
endtry.
System Setup
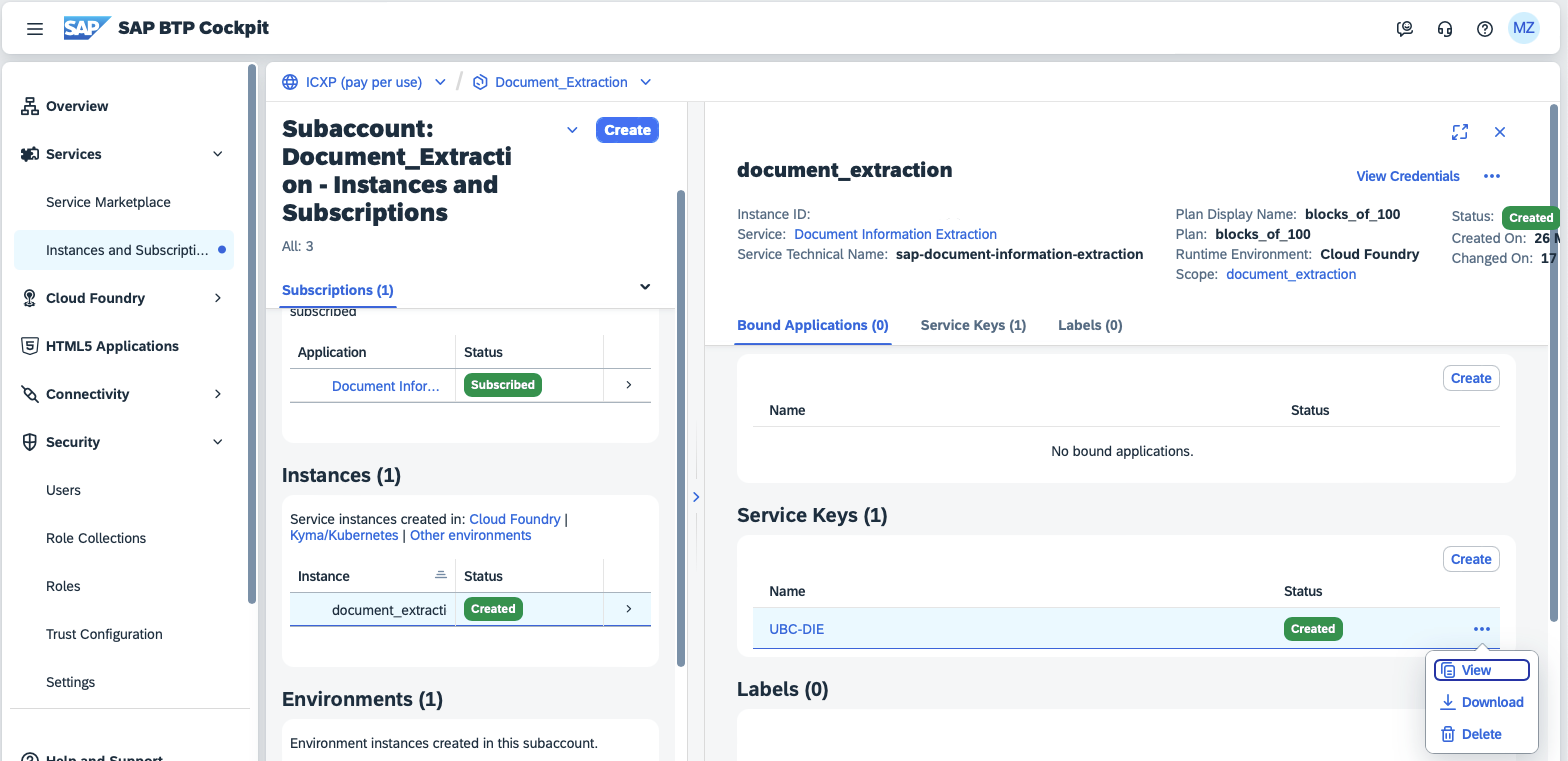
To setup the DIE connection, we will need certain data from the service key of the Document Information Extraction, this could be provided by e.g. your IT support team.
To start the setup, executing the transaction /UBC/DIE_MAIL_SETUP starts the task list:
-
Activate BC-Set
/UBC/DIE_MAILThis step is needed to setup the initial customizing. It is only intended to execute on development/customizing system. Please make sure to have an open customizing request handy. -
Configure Office 365 proxy As mentioned alredy, we offer a standard integration for scanning a Mailbox and transmitting new E-Mails (its attachments) to Document Information Extraction. This step is needed on every system/client for setting up the Connection to Microsoft Mail/O365. The connection settings are not transported. You are free to transport
R3TR TABU /UBC/PROXY, if needed.tipSkip this step if no E-Mail integration is needed
-
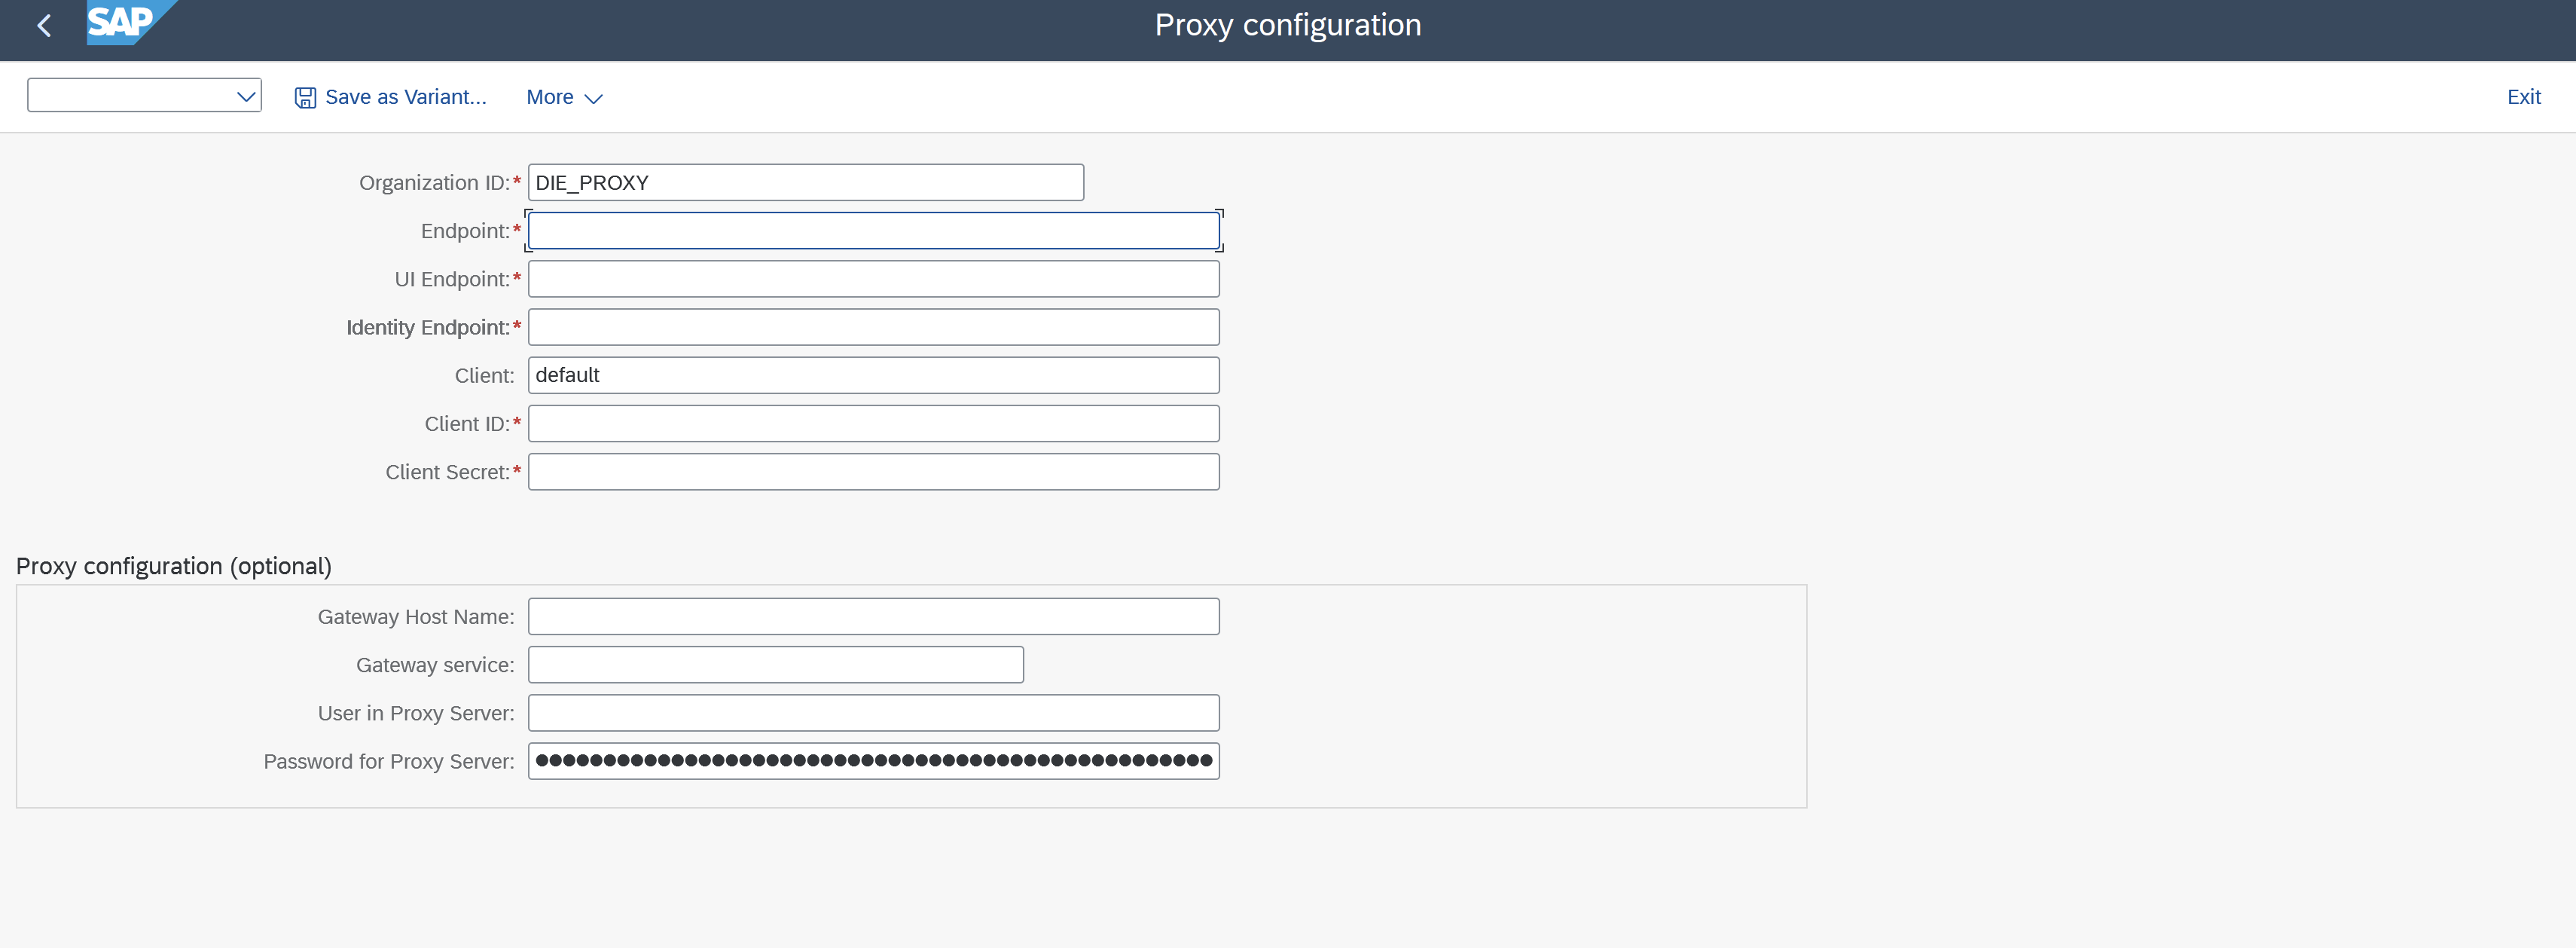
Configure Document Extraction Information proxy This step is needed on every system/client for setting up the Connection to Document Information Extraction. The connection settings are not transported. You are free to transport
R3TR TABU /UBC/PROXY, if needed.
Please use the mapping exapmle below to map the correct fields into the fields of the task list parameters that will set up the connection customizing automatically.{
"url": "{Endpoint}",
"html5-apps-repo": {
"app_host_id": ""
},
"uaa": {
"tenantmode": "",
"sburl": "",
"subaccountid": "",
"credential-type": "",
"clientid": "{Client ID}",
"xsappname": "",
"clientsecret": "{Client Secret}",
"url": "{Identity Endpoint}",
"uaadomain": "",
"verificationkey": "",
"apiurl": "",
"identityzone": "",
"identityzoneid": "",
"tenantid": "",
"zoneid": ""
},
"swagger": "",
"saasregistryenabled": "",
"endpoints": {
"backend": {
"url": "",
"timeout": ""
}
},
"sap.cloud.service": "",
"tenantuiurl": "{UI Endpoint}"
}
-
Schedule Job for polling and processing new mails In order to scan the Mailbox for new, unprocessed, E-Mails, a Job needs to be scheduled which runs periodically.
tipSkip this step if no E-Mail integration is needed
Executing this step schedules a Job for Report
/UBC/DIE_TRIGGER_BY_MAIL. You are free to schedule the Job separately (e.g., via transactionSM36).
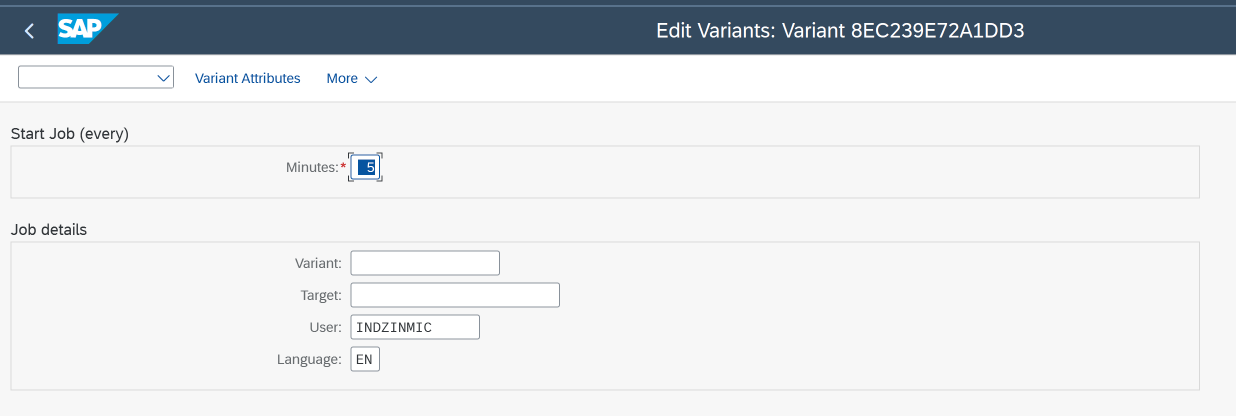
Specify the Information for the Job and especially the Interval the Job will run to scan for new Mails in the configured Mailbox(es). For every unprocessed E-Mail with an Attachment, a Extraction Workflow will be started. Optionally, a Variant can be specified for the Report/UBC/DIE_TRIGGER_BY_MAILif the default settings are not sufficient for your configuration: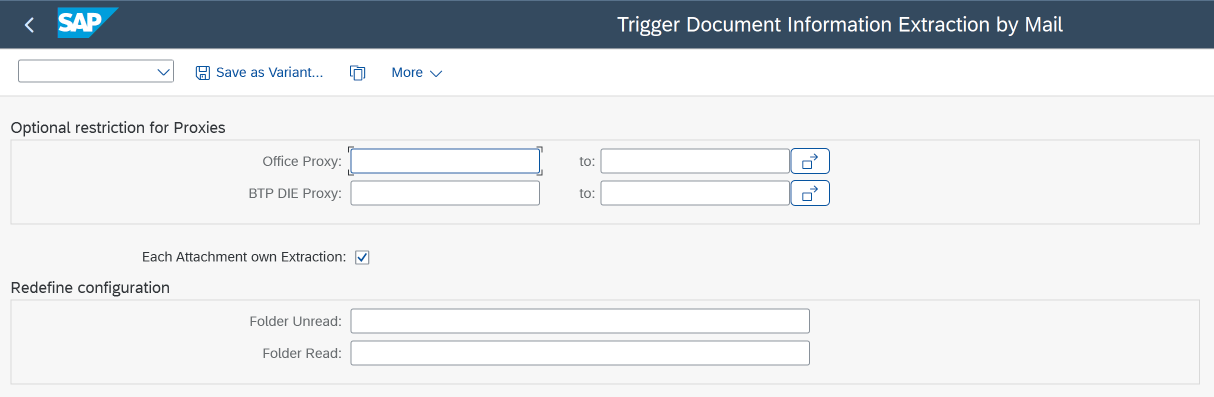
- Proxy restriction Optionally you can choose from your configured proxies by each job run. Usually it can stay empty.
- Each Attachment own Extraction
If checked, a Workflow for every Attachment within a E-Mail will be started.
tip
If not checked, you have to specify the Attachment to be considered for the Extraction in your Implementation, method
CHOOSE_ATTACHMENT()- needs to be redefined. - Folder settings Optionally overwrite the Folder settings for processed/unprocessed Folder for the chosen BO (by Proxies). Leave empty to use the BO configuration.
-
Check health Checks the connectivity for configured proxies (Document Information Extraction and Office365):
- Validity of SSL certificates
- Checks wether Endpoints are reachable
- Validity of Credentials
Make sure to import missing SSL certificates of your DIE Endpoint, DIE Identity Endpoint, O365 Endpoint, O365 Identity Endpoint into your Anonymous PSE (transaction STRUST).

We suggest importing Root certificates.
Extraction results processing
After the extraction of the Document Information Extraction some post processing/custom process/implementation usually is needed to be triggered in SAP. This can be, for example, automatic creation of sales order/invoice/... and is highly specific to a Use case.
Before the result processing gets triggered, a validity check will be executed over the extraction result checking for the minimum acceptable confidence of the results. This value will be set as part of business object setup supporting your process logic. If at least one of the extraction fields is to be of smaller confidence, then the required minimum the processing will stop with an error message and a manual correction (within I/O monitor), or confirmation will be needed from the assigned users. After the corrections, the processing may continue.

Use case Setup
As every UBC use case is based on Business objects we need to define one Business Object for every Use case.
The entries will be transported, make sure to have a open Customizing request handy.
In order to do so:
- go to transaction
/UBC/CUSTOMIZING - go to Business object configuration
- create a new entry
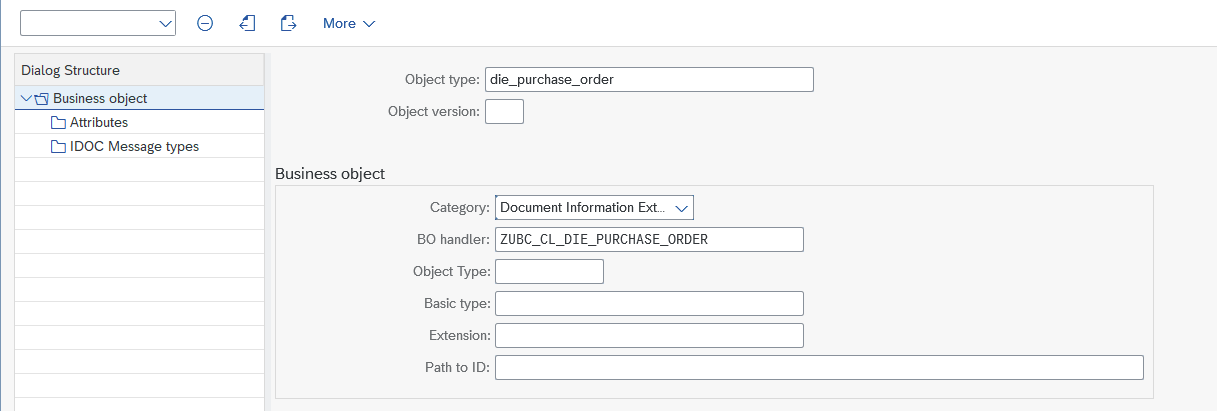
- Object type is completely up to you, choose a meaningful name
- Category needs to be
Document Information Extraction - BO handler needs to be a class created for your use case, see below
- in the view cluster, go to Attributes
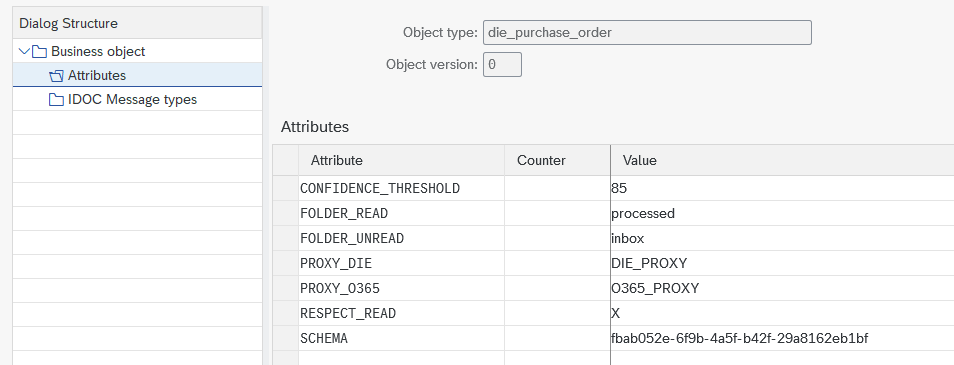
CONFIDENCE_THRESHOLD(optional)
If not given, a threshold of 85% will be used. Please see Extraction results processing for details. Set to 0 if you want to deactivate thresholds. (not recommended)FOLDER_READ(optional)
If you choose to use the Mail standard implementation, specifiy a folder to read unprocessed e-mails from. Access sub-folders separated by/, e.g.Folder/Subfolder. If not given, the defaultinboxwill be used which refers to the Root of your mailbox.FOLDER_UNREAD(optional)
If you choose to use the Mail standard implementation, you can specifiy a folder to move processed e-mails to. After processing, each mail will be marked as read and optionally moved to a given folder. Access sub-folders separated by/, e.g.Folder/Subfolder. If not given, processed mails will not be moved. Distinguishing between processed/unprocessed then just happens by read and unread Mails.PROXY_DIE(optional)
If you chose to connect multiple Document Information Extraction Endpoints to your System/Client, the use case needs to be linked to a specific Proxy.
Can remain empty, if there is only one service connected.PROXY_O365(optional) If you chose to use the Mail standard implementation and connected multiple Mail Endpoints to your System/Client, the use case needs to be linked to a specific Proxy.
Can remain empty, if there is only one service connected. If there are multiple use cases for Mails, it would be beneficial to have multiple Proxies configured in SAP (technically, no separate mailboxes are needed). Linking your Business Object to a dedicated Proxy allows the assignment of a specific implementation for a new Mail.RESPECT_READ(optional) If you chose to use the Mail standard implementation and do also want to respect already read E-Mails in your mailbox/folder, set this attribute toX. If empty, only Unread E-Mails in your mailbox/folder will be respected.SCHEMA(❗ mandatory) You need to specify the schema you would like to use for your Use case. In order to do so we need the Id of the schema:- go to Document Information Extraction UI
- in the left menu, choose Schema configuration
- navigate to the desired schema
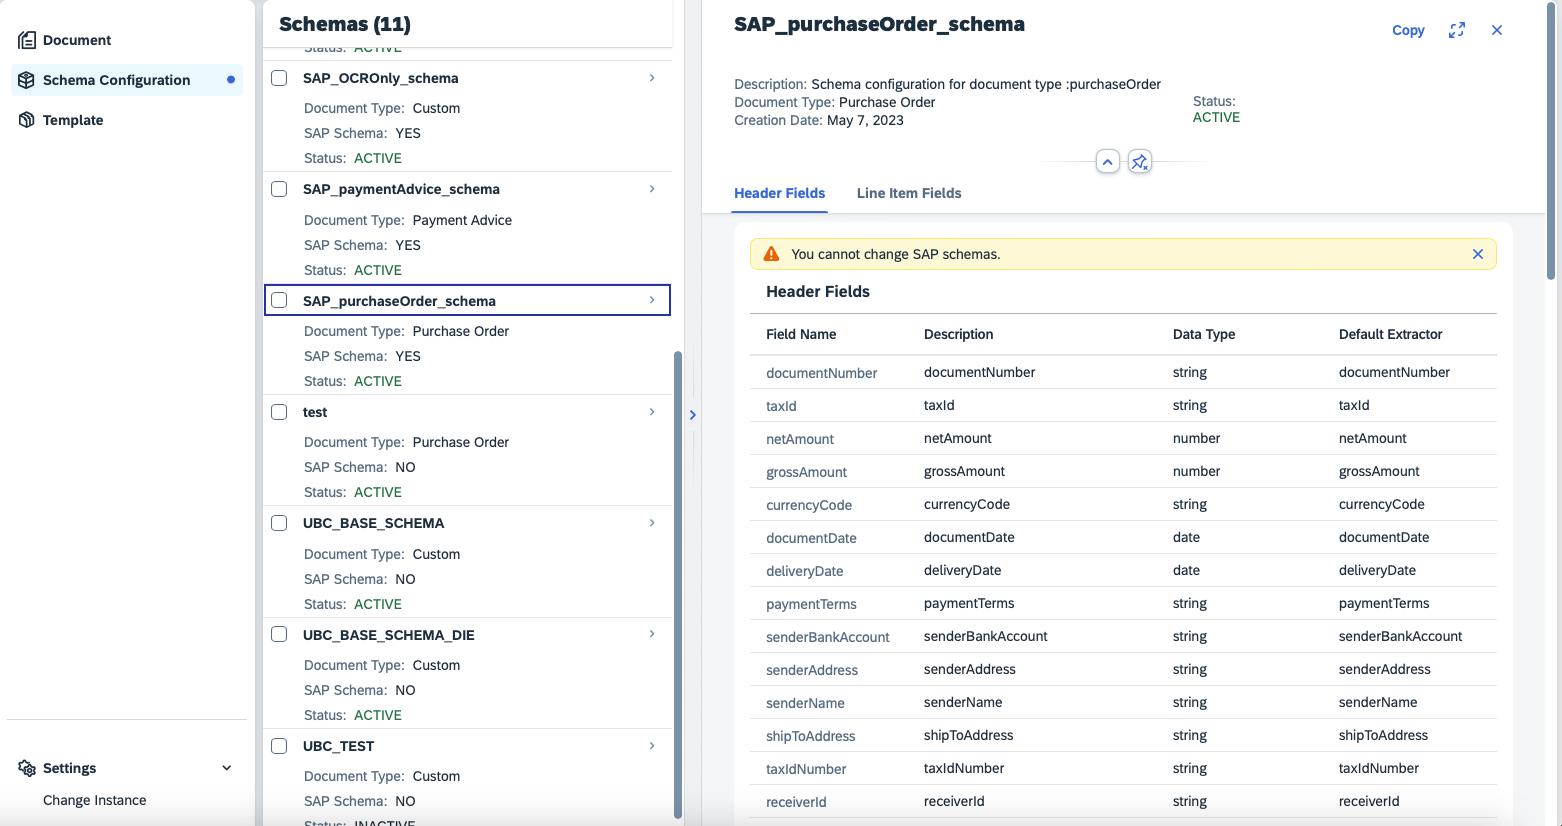
- in the address bar, inspect the URL. It will look like something like this:
<<die_ui_endpoint>>/ui/index.html?clientId=default#/schemaconfiguration&/sc/schemadetail/fbab052e-6f9b-4a5f-b42f-29a8162eb1bf/1/TwoColumnsMidExpandedWe will need the part behindschemadetail, in this example:fbab052e-6f9b-4a5f-b42f-29a8162eb1bf - paste the schema id to your attribute value
In general, custom implementations will be injected into the process, that will determine what should be done with the results. UBC provides standard implementation for certain usecases for example mapping into QALITY02 IDoc structure or creating sales orders.
The implementation differs at some point wether you need a implementation by template or by use case. Usually, when choosing standard document types one implementation for your use case is sufficient. When choosing custom document types, it may also be necessary to have dedicated implementations for every chosen template.
One implementation by use case
Subclass the class /UBC/CL_DIE_BO_MAIL_SINGLE for your custom implementation and specify the class name in Business Object handler class (see above).
The method process_result( ) is the only abstract method, you are forced to redefine the method. Basically, you will get the Extraction results and all the metadata to do the processing of the Extraction.
One implementation by template
Choose the generic Business Object handler class (see above) /UBC/CL_DIE_BO_MAIL (you are free to subclass, if you need some special jump logic, ...).
The logic to be executed will be defined in a post processing class, that will be determined by the extraction's template id:
- go to transaction
/UBC/CUSTOMIZING - go to Document Information Extraction/Link Template to Implementation
- Create new entries for every handler needed
- Schema id Just reuse the one chosen in Business Obect Attributes (see above). Leaving empty means it is valid for all schemas.
- Template id
Specify the template id of your previously created template in Document Information Extraction UI.
- go to Document Information Extraction UI
- in the left menu, choose Template
- navigate to the desired template
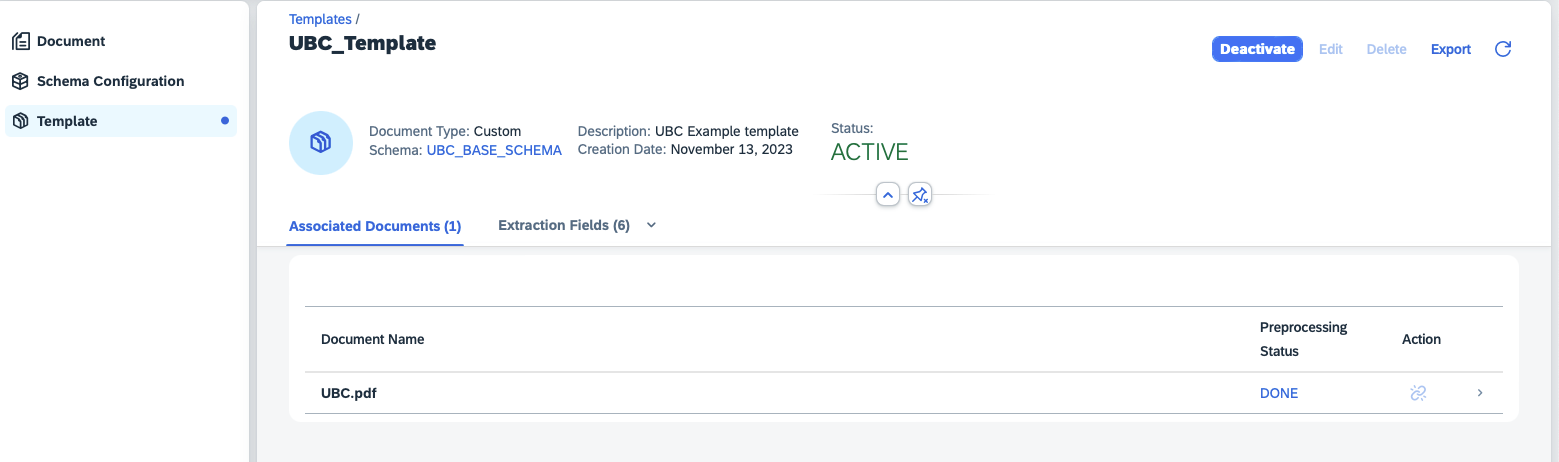
- in the address bar, inspect the URL. It will look like something like this:
<<die_ui_endpoint>>/ui/index.html?clientId=default#/template&/t/templatedetail/1e1d1410-5ad0-4086-a611-a4d4319b3d00We will need the part behindtemplatedetail, in this example:1e1d1410-5ad0-4086-a611-a4d4319b3d00 - paste the template id to the customizing field Leaving empty means it is valid for all templates (of the given schema).
- Class name
Specify your processing class, implementing the interface
/UBC/IF_DIE_POST_PROCESSING(Example implementations given). Basically, you will get the Extraction results and all the metadata to do the processing of the Extraction.
I/O Monitoring
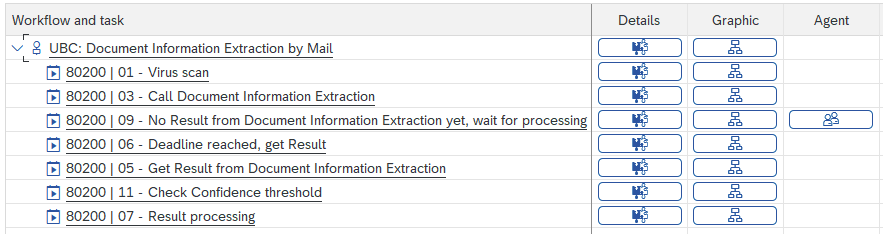
Every message is internally controlled by a workflow and monitored with our generic I/O Monitoring.
Go to transaction /UBC/IO and specify the interface name UBC_DIE_MAIL.
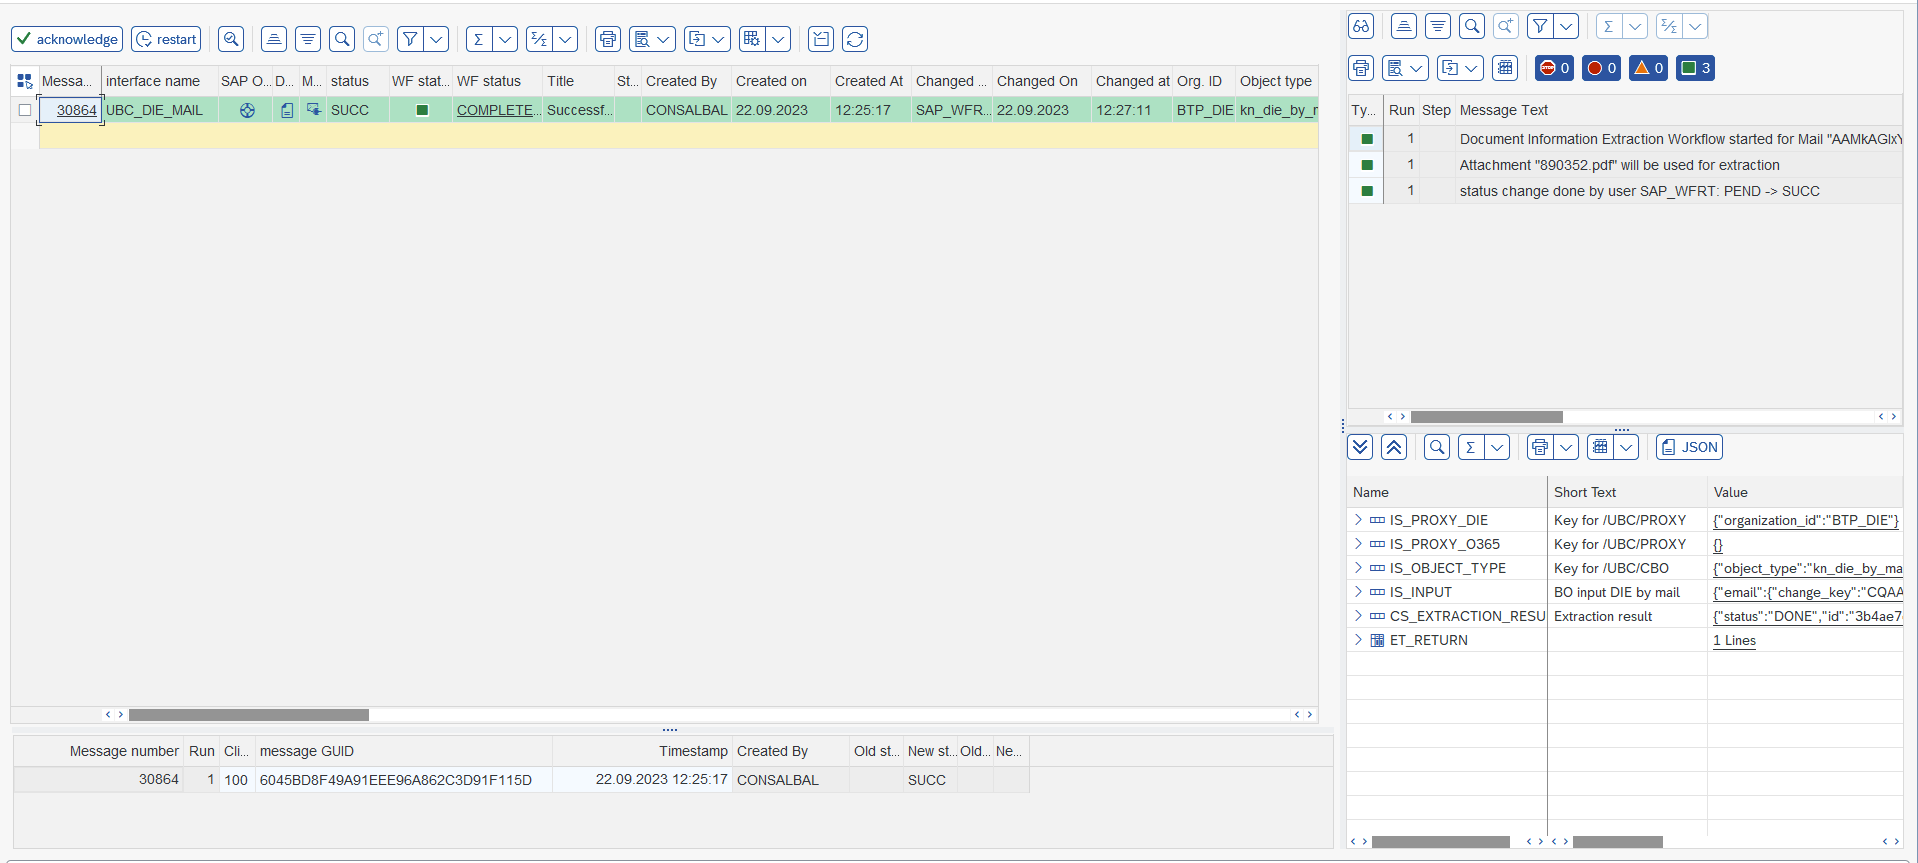
Errors can be restarted or the workflow just acknowledged/quitted.
We further offer some out-of-the-box Jump possibilities:
- Jump to Document Information Extraction UI
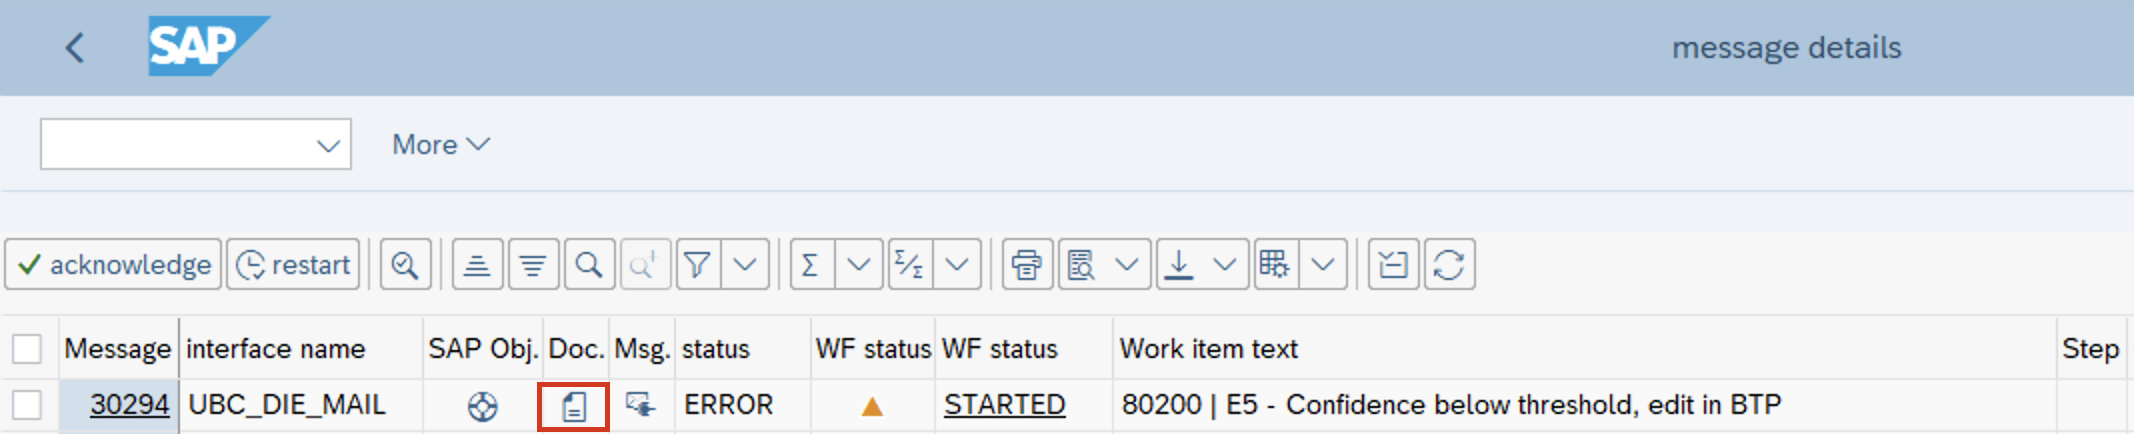 If a manual correction is needed in the extraction results, the document button can be used for each message in the IO monitor. This opens the browser and takes the user directly to the concrete document, where the results can be manually changed and saved. On user save all of the fields will have confidence of 1 meaning 100% because they were edited by a user thus should be correct.
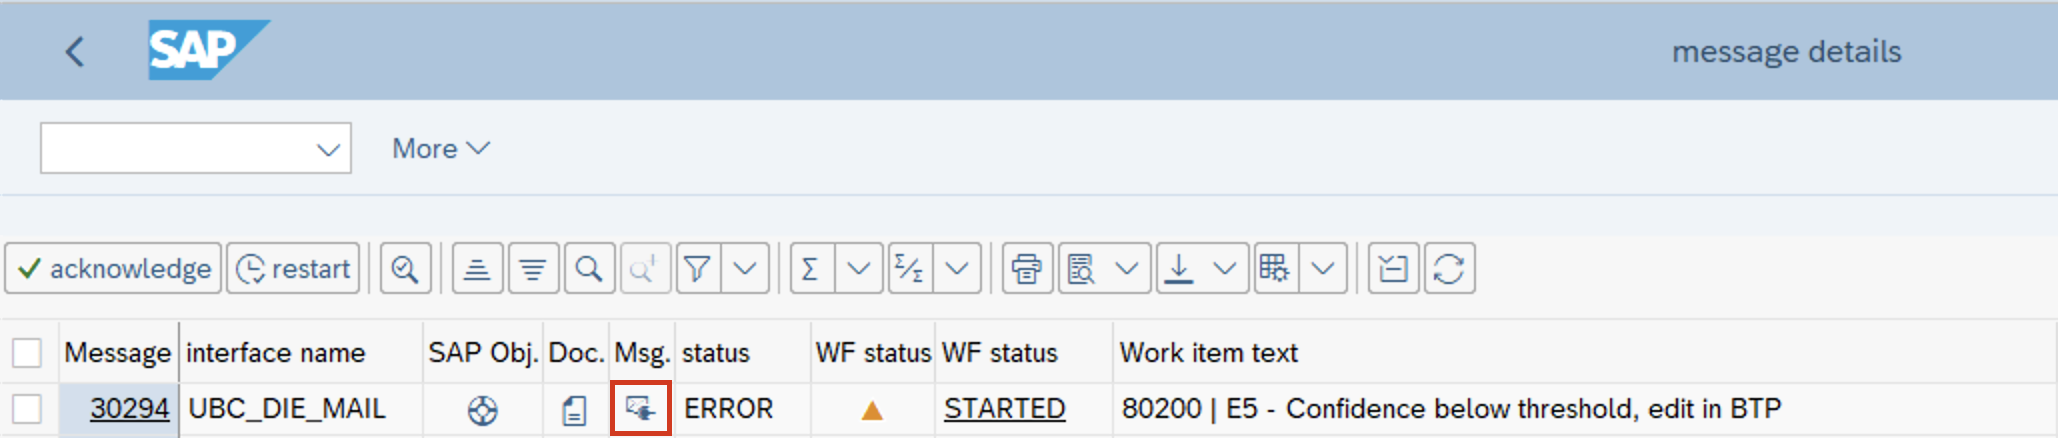
After the changes are saved the message can be restarted in the I/O monitor, this will result in fetching the extraction results again (with the updated values) and continue the processing with the next step. - Jump to original Mail in O365
- Jump to newly created Business Object
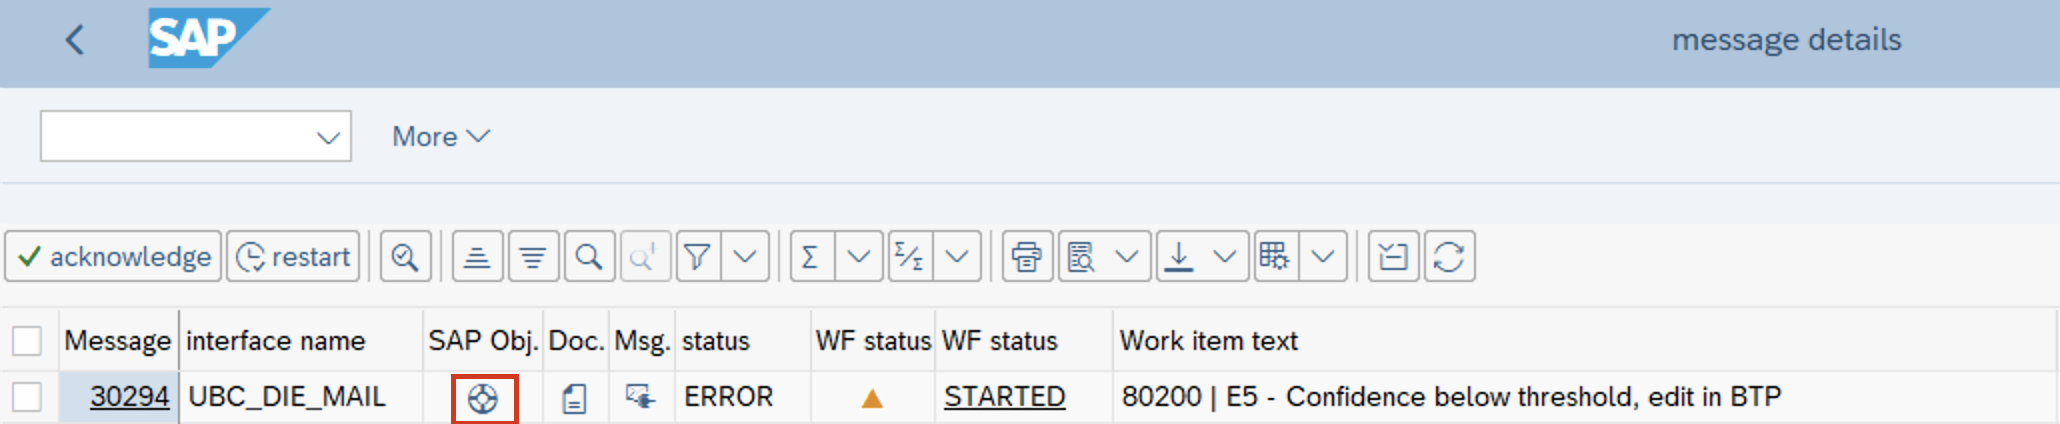 If your post processing implementation creates/changes SAP standard objects (BOR), you can jump to those created Objects.
Example Use cases
Some example Use cases we implemented earlier.
Purchase Order

The goal is to parse and validate a given Purchase Order sent by a customer via E-Mail, to trigger enrichment of purchase order:
- finding products
- derive partners like sales-to, ship-to by address information
- ...
controlled flexibly via BRF+, include some checks and finally create a sales order.
Clearly the intention is to massively reduce the manual effort of creating sales orders in the SAP system for customers without EDI integration. The extraction is based on the SAP standard schema. No template creation is needed for this standard document type.
Most beneficial is that the extraction result will be just further enriched with masterdata/BRF+ in the SAP implementation directly.
Purchase Order Extraction results processing
After extraction, the post processing will be called which basically enriches the data via some BRF+ rules and masterdata.
The extracted, enriched and validated data then will be used to create a sales order directly in SAP using standard APIs called after the enrichment.
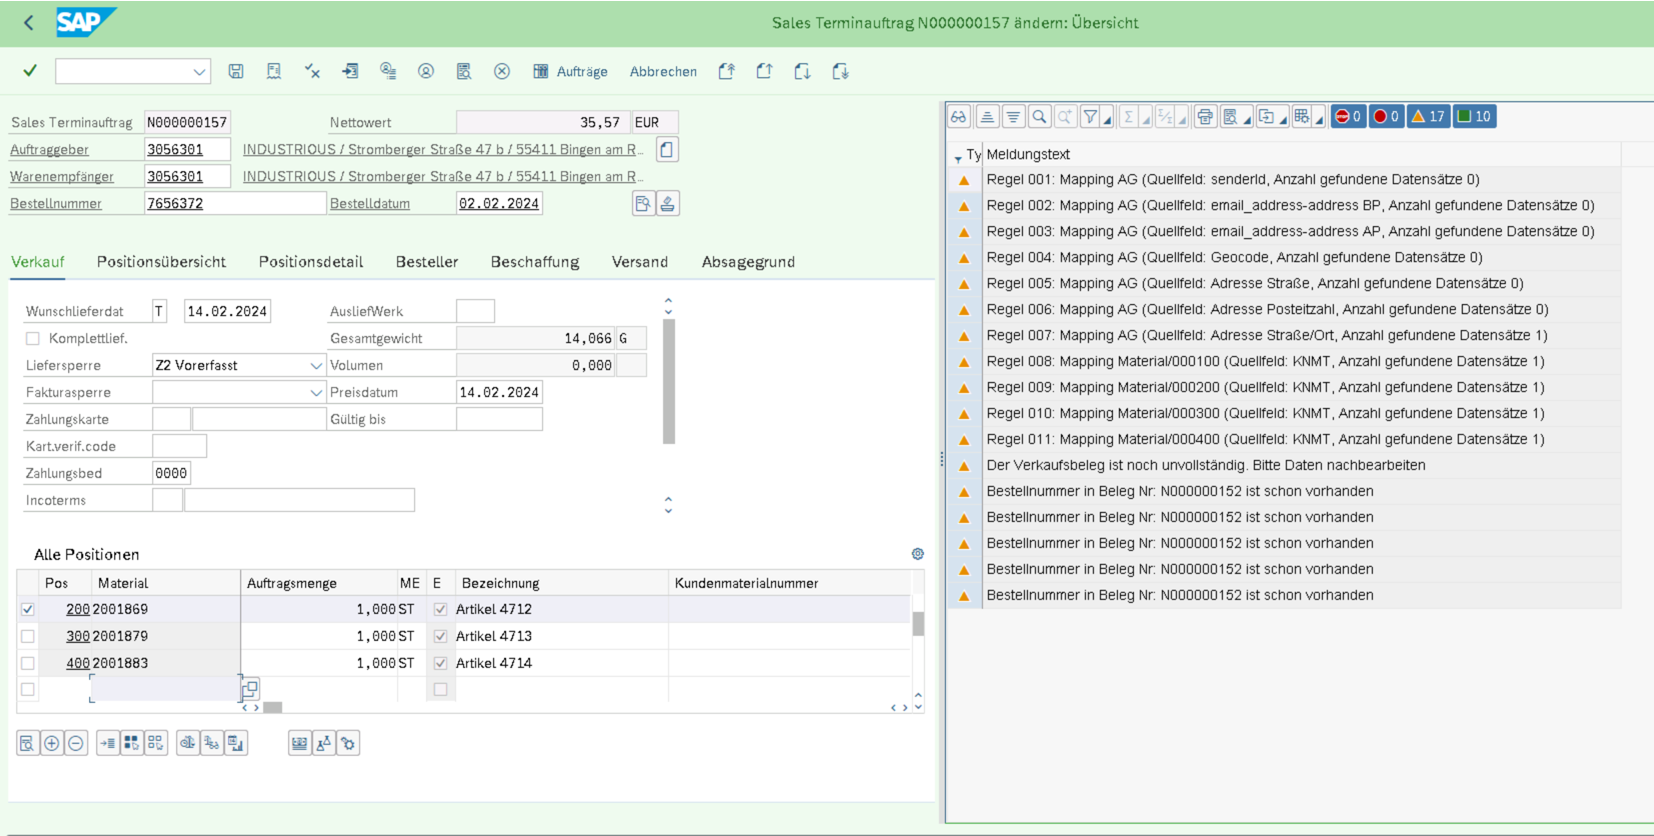 The sales order just gets created with a newly created document type, showing the processing log as a docking container (for the GUI transaction).
The original attachment and mail gets persisted/archived to the sales order itself.
Using UBC, Document Information Extraction and our SAP integration expertise we implemented a fully integrated "purchase order E-Mail" to SAP sales order solution.
Certificate
The goal is to parse and validate a certificate sent by a vendor via E-Mail and to trigger automatic inspection lot creation based on that information.
The extraction is based on a custom schema and a few templates in Document Information Extraction.
The extracted data will be mapped to an IDoc of type QALITY02, that will be used as an input for the automatic inspection lot creation.
Certificate Extraction
The result should be mapped into an IDoc structure of type QALITY02 and for that we will always need to extract certain fields from the certificate regardless of the type or layout. These fields can make their way into a schema belonging to this process. The fields are the following:
| Header Fields | Suggested Field Name | Type |
|---|---|---|
| Order number | PO_Num | string |
| Item number | PO_Item_Num | string |
| Material number | Material | string |
| Line Item Fields | Suggested Field Name | Type |
|---|---|---|
| Name of the characteristic | Characteristic_Name | string |
| Value of the characteristic | Value | string |
| Unit of measurement | UOM | string |
The schema and template in Document Information Extraction will be configured accordingly, a custom document type will be used.
Certificate Extraction Results processin
After extraction, an IDoc will be used to trigger inspection lot creation with some integrated validity checks as standard.
This mapping and minor validation is handled by custom ABAP classes linked to specific templates, see here.
Specific handlers by template were needed, because of the fact that some vendors send multiple items of different purchase orders in one document that needed to be processed differently. Thanks to the flexbility of UBC, we can make use of ABAP OO and provide some smooth implementations by "template type".